Free Shipping on orders over $150
Talk to an Airgun Specialist 1-866-477-4867


Definitive Guide to Brocock Bantam Sniper
The market has been asking for a high-end airgun with all of the adjustability and accuracy that we have come to expect from "luxury" PCPs but with the ruggedness and durability of the toughest truck gun. Introducing the Brocock Bantam Sniper HR and the Bantam Sniper Magnum. These are PCPs that have all the features and accuracy of the most expensive airguns on the market but in a form that will appeal to shooters used to the black tactical look of modern firearms.
Highlights
The market has been asking for a high-end airgun with all of the adjustability and accuracy that we have come to expect from "luxury" PCPs but with the ruggedness and durability of the toughest truck gun. Introducing the Brocock Bantam Sniper HR and the Bantam Sniper Magnum. These are PCPs that have all the features and accuracy of the most expensive airguns on the market but in a form that will appeal to shooters used to the black tactical look of modern firearms. Video
We'll break this guide into two parts and in the first, we will give an overview of the Sniper focusing on the Bantam Sniper HR, and in the second, we will look at what makes the Sniper Magnum different. 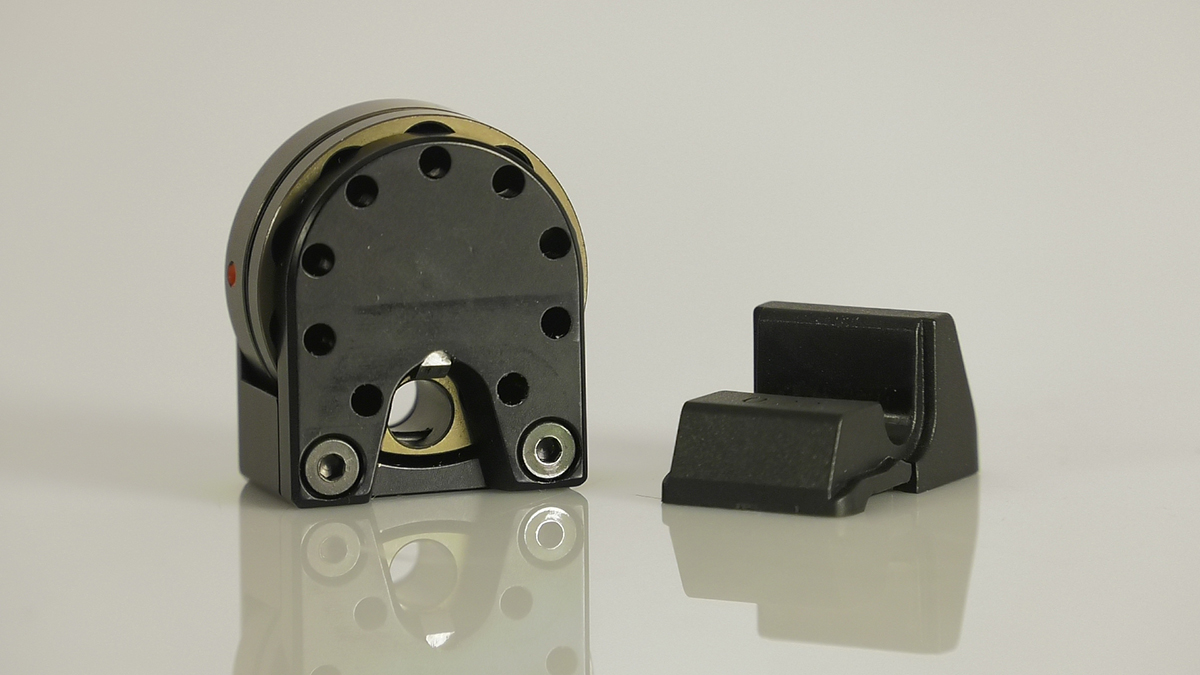 The Sniper isn't a safe queen; it is designed to take use and abuse (within reason, folks!), and for this, it sports an all-weather synthetic stock that won't easily get scratched or dented. The polymer is rigid, strong, and very solid, and it should please even the pickiest shooters. The gun shoulders very well with a nice balance, and the stock is ergonomic, with mild texturing on all surfaces. It's too subtle to give a lot of extra grip when the gun is wet, but it is comfortable and pleasant to hold. The stock also has an adjustable comb to give you the perfect cheek weld for the repeatable sight picture that is so important for accuracy.
 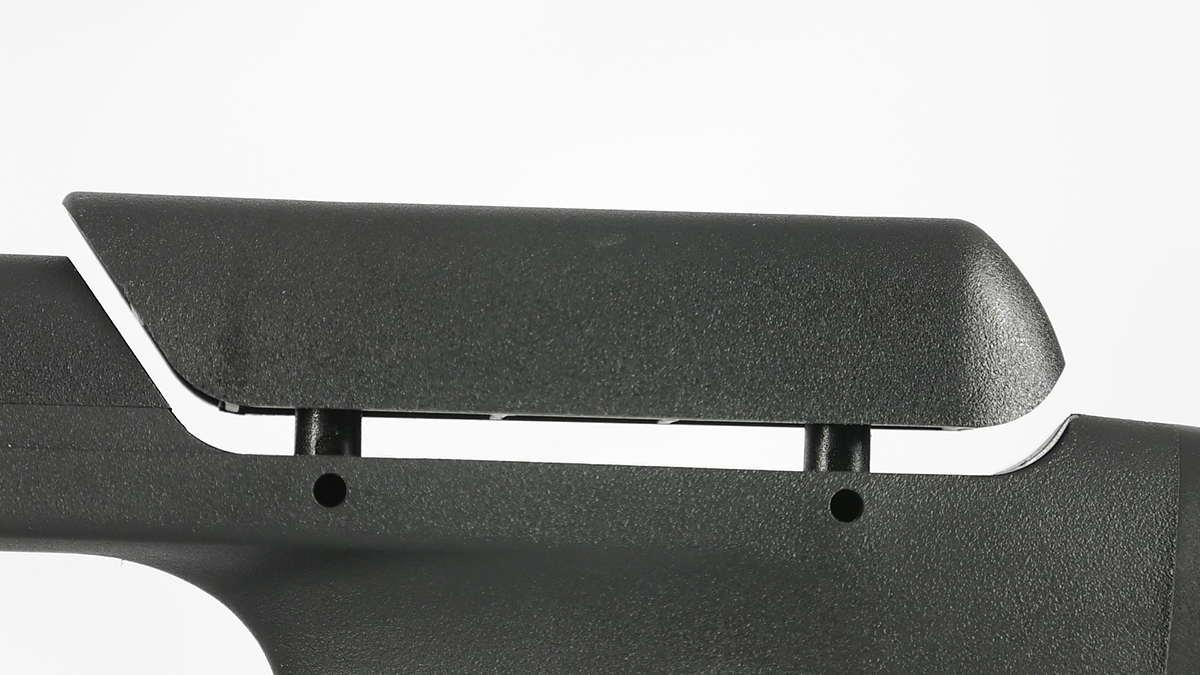 The butt pad also gives you vertical adjustment for the perfect fit, just loosen up the screw a bit - if you go too far it will unscrew completely and it's a bit of a trick to get back together. The length of pull (the distance between the trigger and the butt) is 14 3/4 inches, so even though this gun is very compact it doesn't feel cramped at all. The grip is about average size, but it is positioned so that you if you have large hands you will still have very good trigger management, and our only gripe is that you can't shoot in a thumbs up position; but there is really no getting around that with a semi-bullpup configuration. Speaking of the trigger, it is a very crisp, fully adjustable, two-stage trigger. Straight out of the box, over three pulls the trigger on our gun measured 1lb 11oz, 1lb 12oz, and 1lb 12.1oz, for an average of 1lb ll.7oz. Not only is it very crisp, but it is extremely consistent which is fundamental for accuracy. As it comes from the factory it is set up to be a great sporting trigger, but if you like it lighter it can be adjusted down. The principal adjustment for weight of the trigger is the sear engagement screw which is accessed by removing the stock. Since it adjusts sear engagement directly it is easy to make the gun unsafe. In our experience, at about one pound or a little more the trigger begins to fail the mallet test, that is, the gun goes off when hit on the butt pad with a large rubber mallet, so make sure you keep the gun safe as you adjust it.
 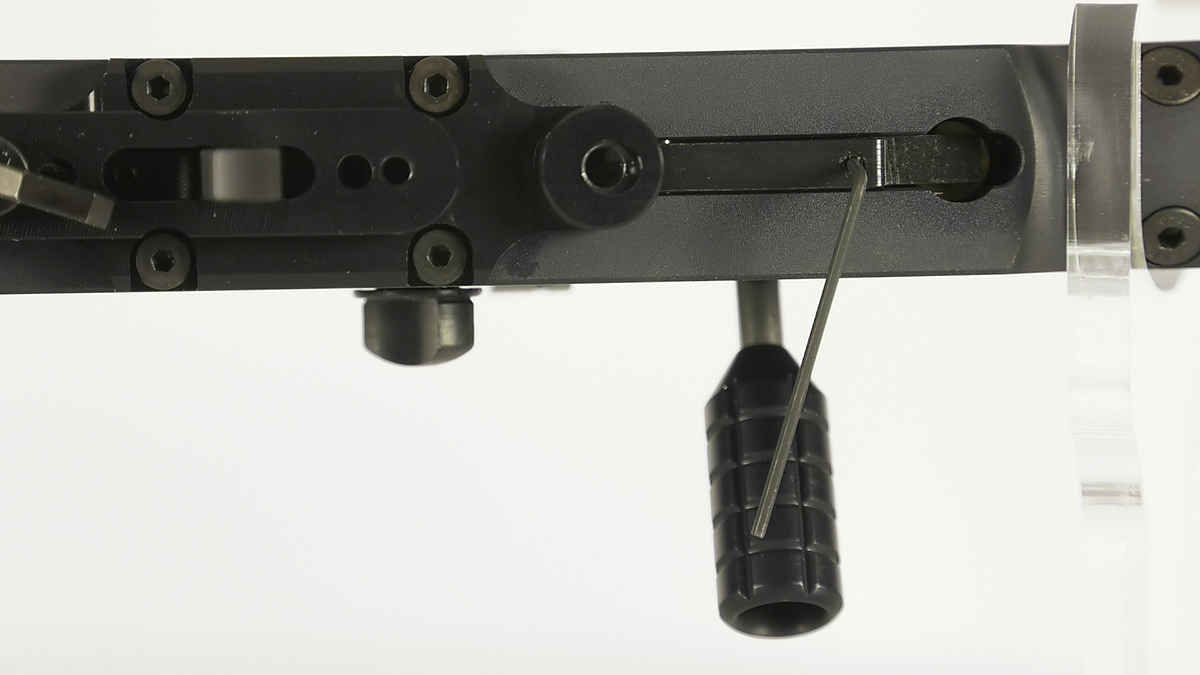 The Bantam Sniper has surprised us with a lot of little details that are often not done nearly as well on other guns. You charge the gun with a Foster quick disconnect so there are no pesky probes to lose when you need them most, and the Foster fitting has a dust cover that slips into place with rare earth magnets. It stays on very firmly, but it is easy to remove. As we said, it's a little thing, but it is a very nice touch that makes the filling of the gun much more pleasant.
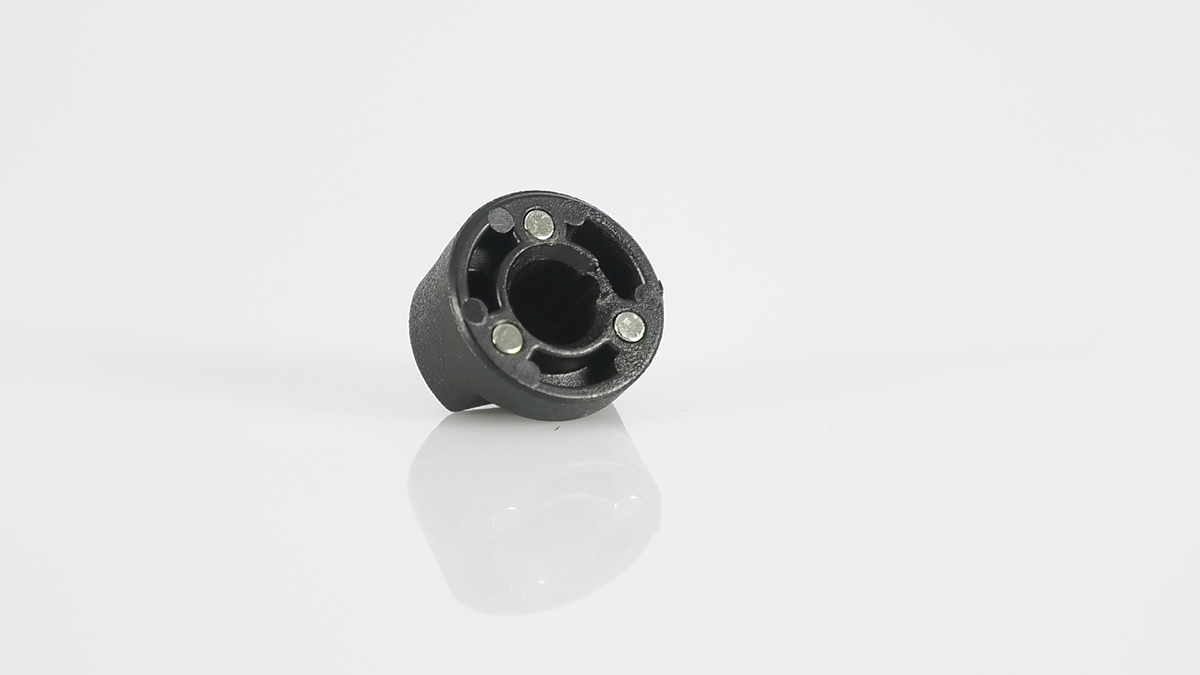
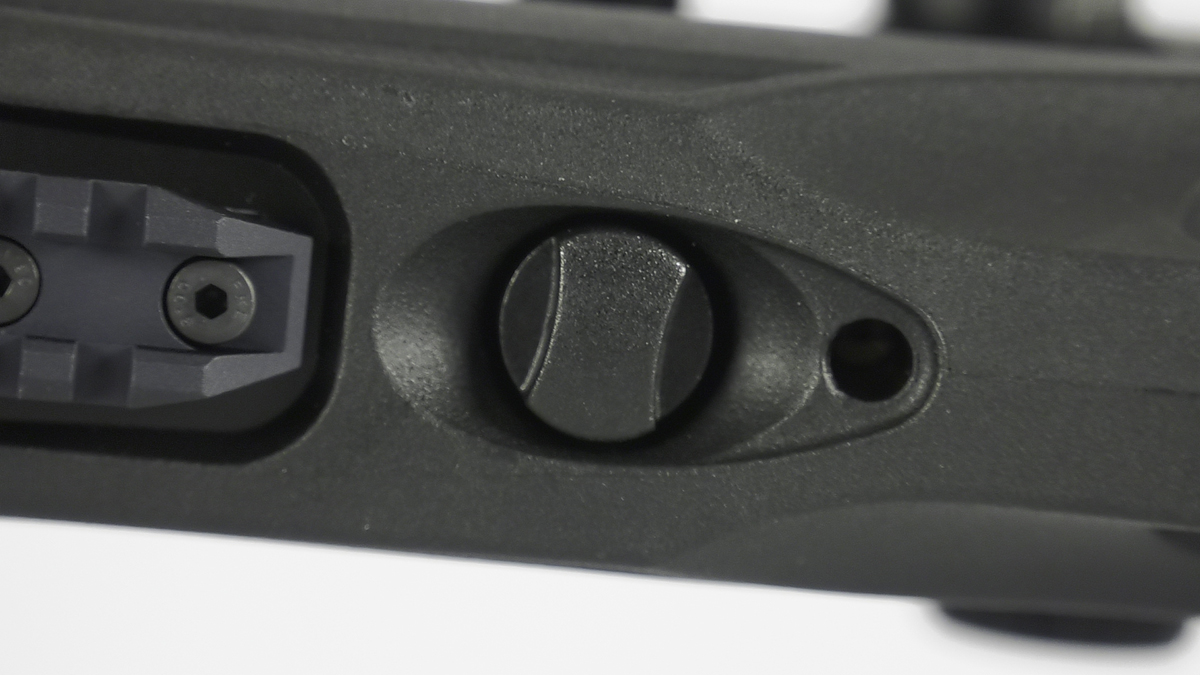
 Another thing we really like is that Brocock has fitted a picatinny rail to the stock so it is ready for a bipod or other accessories.
 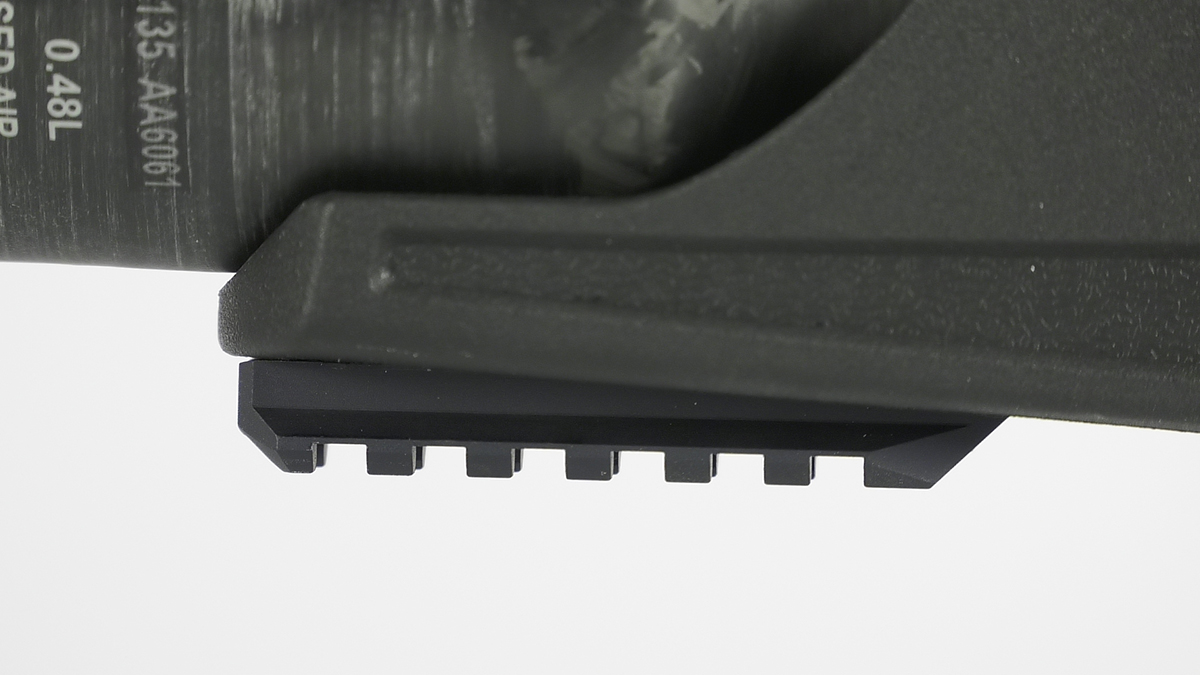 Pic rails come standard on the Bantam Sniper, but if you want to drop the scope down even lower, you can remove them and use the dovetail rails, however, depending on your scope's eye relief and your build you may need offset scope rings.
  The manometer, or pressure gauge, can be a little confusing because from 200 to 250 bar the gauge shows red, but just ignore that because the max fill pressure on the carbon fiber bottles is 250 bar.
 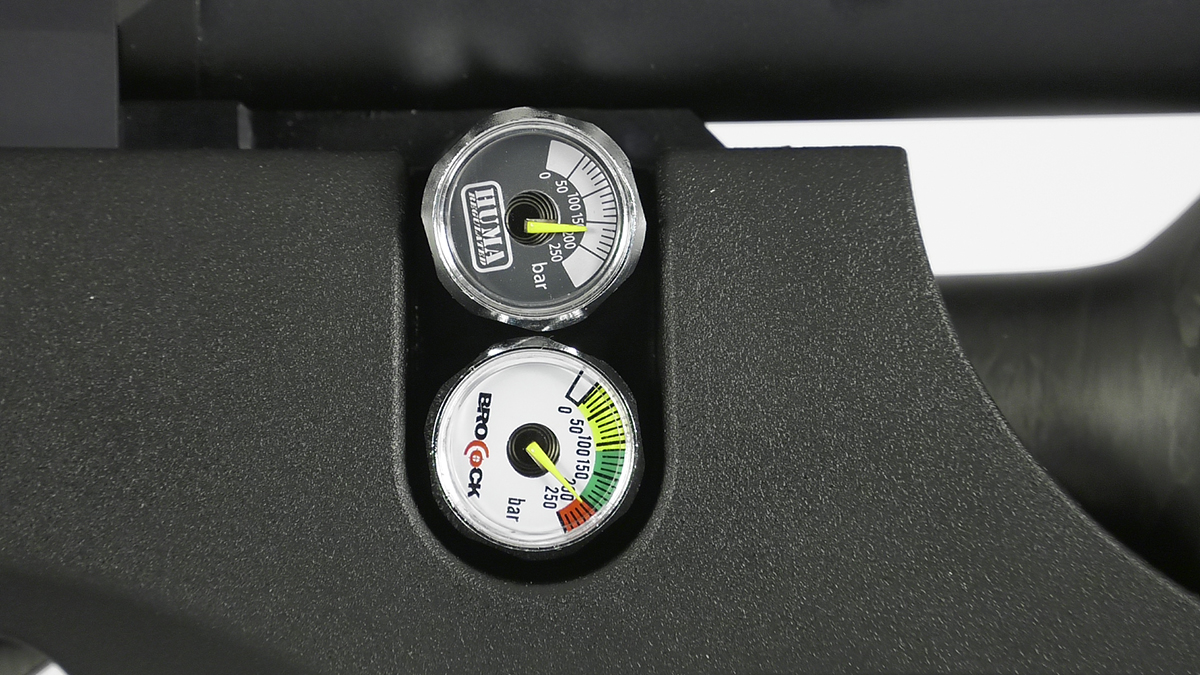 Bolt actions have been popular for a long time because of their absolute reliability, so even though we have gotten used to sidelevers, we really appreciate the bolt action on the Bantam Sniper. This gun is built to last and be reliable each and every time you pick it up, so a rugged bolt action was a great design choice. The handle is large and gives you a very good grip, and there is no preload on the hammer spring so all of the cocking effort takes place in the last third of the throw. It isn't hard to cock at all and the action is smooth, and will smooth out even more with use. The lack of preload is because of the slingshot hammer which uses air very efficiently by reducing hammer bounce. If you shake the gun, you may hear the hammer moving, but that is a very good thing!
 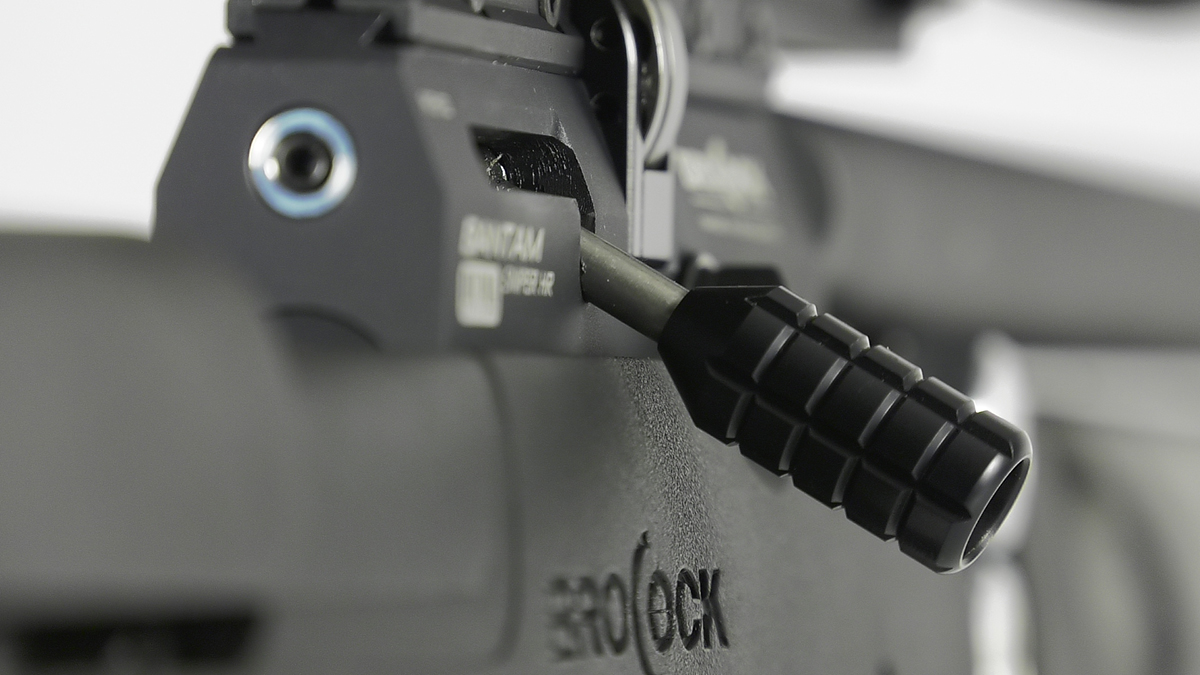 The 17" Lothar Walther barrel is free floated for accuracy, but unlike many air rifles with floated barrels, this one won't shift its point of impact with every twig and branch it bumps up against because the thick barrel coupled with the large shroud makes for a very rigid rifle. And rigidity equals accuracy. The barrel is threaded for aftermarket accessories but the shroud takes care of a lot of the hushing of the gun so you may not feel the need for anything extra. In our testing, the .25 caliber Sniper registered a high of 94.8 dB on power setting five (max). On power setting three, it measured 91.8 dB, which is well within backyard friendly range for almost all backyards. .177 and .22 caliber guns will be even quieter. The shroud can be easily unscrewed, and removing the barrel for cleaning is also very straightforward. All you have to do is remove the top rail to expose two grub screws. Remove these and gently pull the barrel out. When you have run your patches through it, put a light coating of silicone grease on the o-rings that encircle the barrel, reinsert it carefully, and snug the grub screws down.
 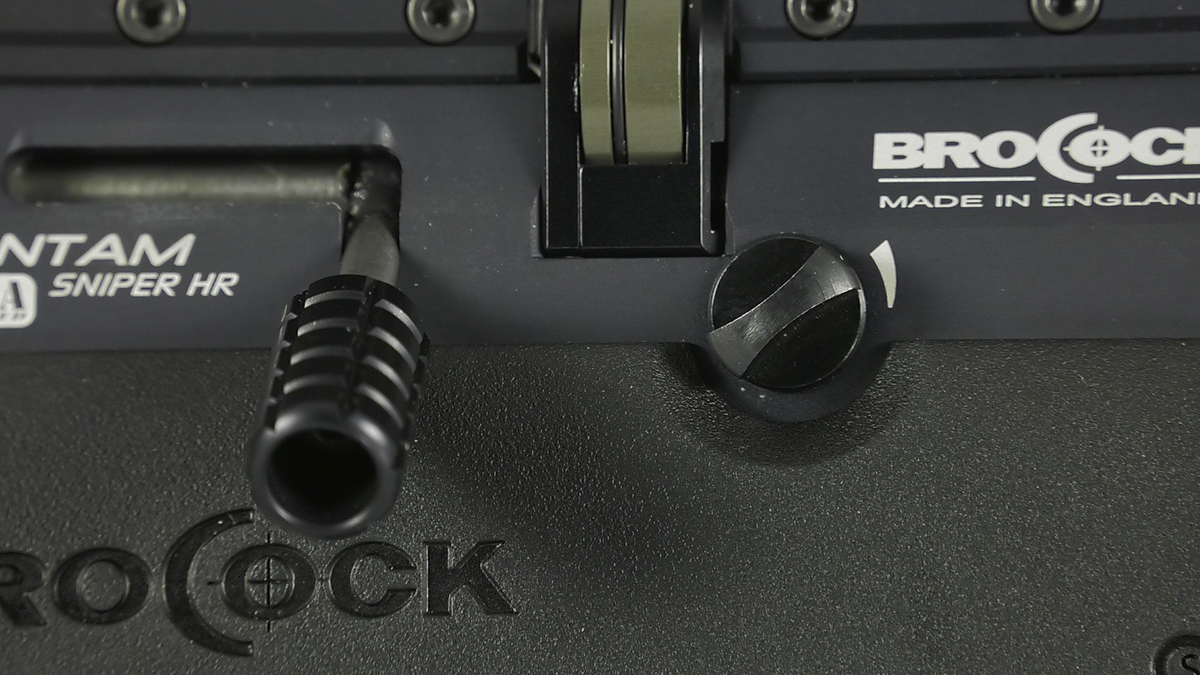 One of the main benefits of the TP adjuster is the ability to quickly switch between different weights of pellets or to quickly throttle the power when you want to prevent pass-through and damage to backdrops, such as when you are shooting inside a barn or in the backyard. Turning the power down will conserve some air and give you some extra shots, however, since the transfer port adjustment affects airflow after it has left the valve the increased efficiency isn't proportional to the drop in power the way it is with a hammer spring adjustment. In other words, you will get some extra shots by turning it down, but not a ton of extra shots. In our testing of the Bantam Sniper Magnum, we got 62 shots on power level 4, but when we turned it down to level 3 we got 86 shots, which is actually a pretty significant increase. The hammer spring adjustment on the Bantam can be used to fine tune the gun or to make large adjustments that will directly affect the shots per fill - crank it in for more power and fewer shots or turn it down for lower power and tons of shots per fill. To adjust it you will first need to remove the stock. Put the gun on 'safe' and use a 5mm Allen wrench to unscrew the bolt inside the base of the handgrip. Now you can remove the stock, which will expose the hammer spring nut at the rear of the receiver. Using the same 5mm Allen wrench, you can turn the nut counterclockwise to reduce the power and clockwise to increase it. If you make large adjustments you may need to adjust the HUMA reg to complement it. For instance, if the reg is set high (150-160) but you are turning the hammer spring down quite a bit you will want to drop the reg down also. Conversely, if you have the reg low but are maxing out the hammer your velocity may actually go down until you bump the reg up or back the hammer off again.
 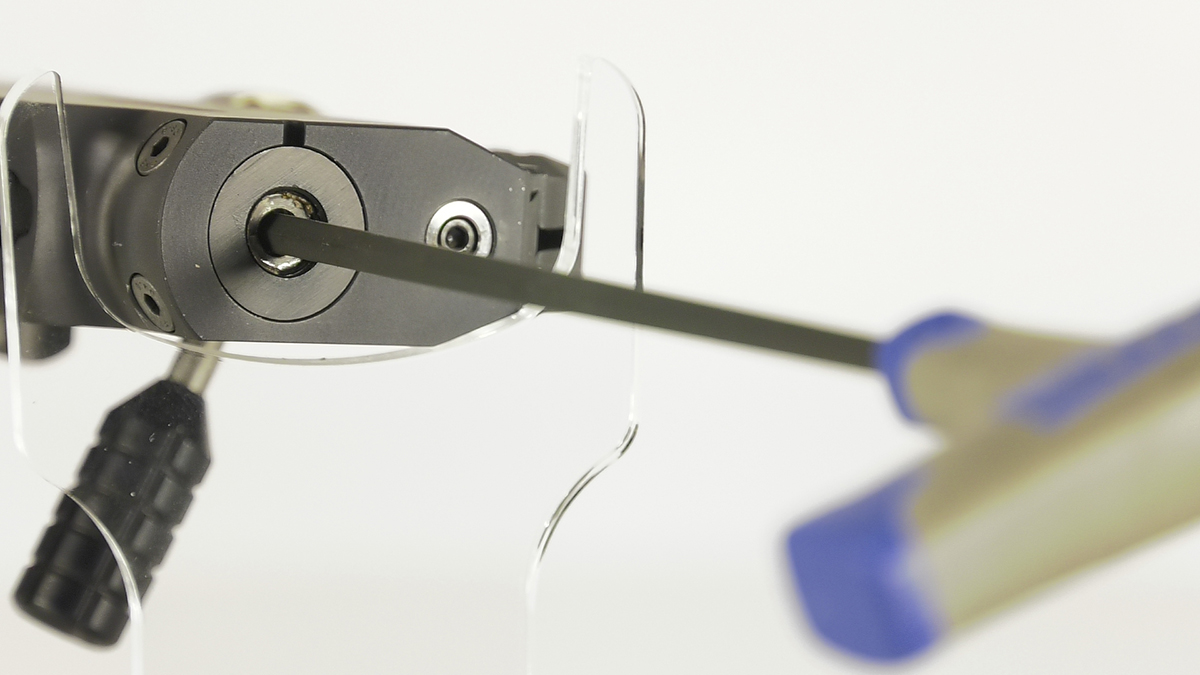 The HUMA regulator is perhaps the best airgun regulator currently made. It doesn't creep, it is extremely consistent, and, in the Bantam, it can be adjusted externally with just the turn of a screw. We shot five individual guns and we were astonished by the consistency of them straight out of the box. Typically regulators need a break in period before they reach optimum consistency, but with the very first shot strings we took with them we were getting extreme spreads of 6 fps and standard deviations in the 1 and 2 fps range. This is the best we have ever seen!
 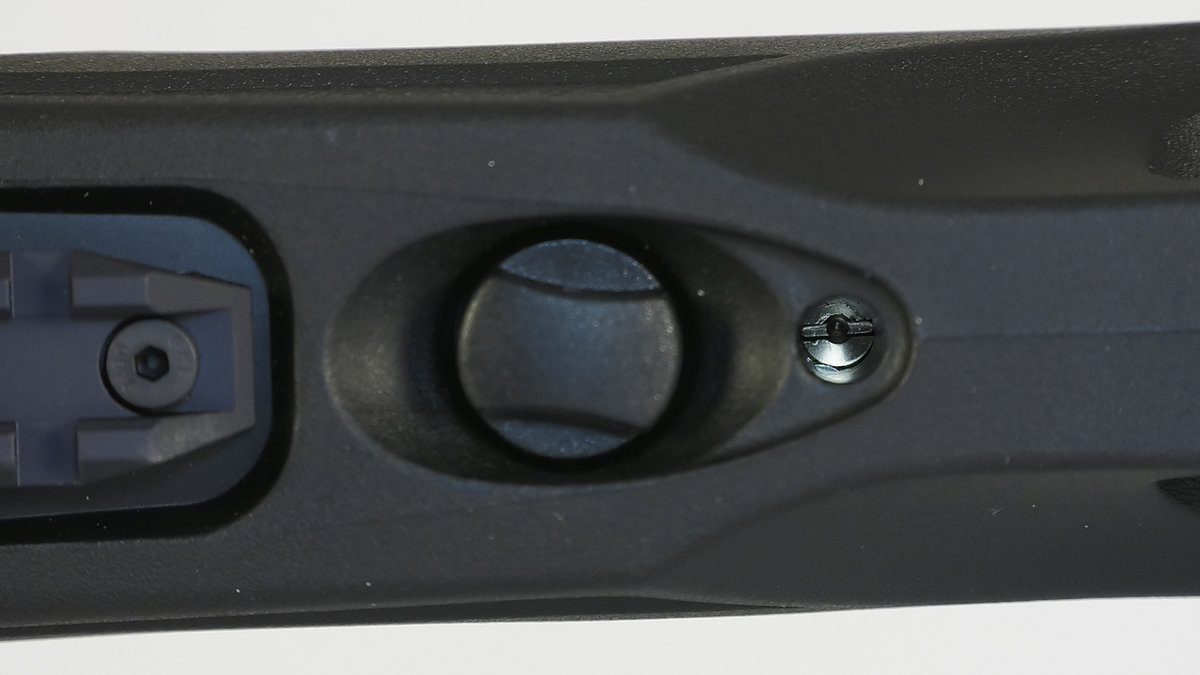 Be warned, though, that when you lower the reg pressure you need to empty the gun of air first! Since it can be tedious to do this over and over, we recommend that you degas the gun, set the regulator very low, perhaps around 100 bar, and adjust it up from there. Here is how you do that: We would normally loosen the foster fitting but it has an anti-tamper feature, so to empty the gun you need to loosen the manometer (pressure gauge). If you have a large enough wrench, great; otherwise, take a crescent wrench and carefully (so you don't scratch it up) turn the gauge until the air begins to escape. Don't keep going, or that gauge will turn into a very powerful projectile! Just leave it alone until the air is gone. When the tank is empty you will still have air in the regulator, and that's the air that we are really concerned about getting rid of, so you'll need to empty it by firing the gun. Now you are ready to make your adjustments. Turn the screw in a bit to lower the reg pressure, being careful not to bottom it out all the way. Now you are ready to charge the gun back up. If the reg is lower than 100 bar when you fill up the cylinder, bump it up and start adjusting from there. The HUMA reg can be adjusted all the way up to 200 bar, but with the 17" barrel you probably won't see much benefit past 150-160 bar at the very most. Tuning is a matter of balancing out the three adjustments. Here is how we would go about it. First, decide what you will be doing primarily with your gunif you are shooting in your backyard you may want a lot of shots that are fairly quiet so you will tune it down to shoot a lighter pellet. If you want to do long-range shooting then you'll want plenty of power with a heavy pellet. If you want to do both, you can probably leave it the way it came from the factory because the out of the box tune is pretty good for all-around shooting. For max shots per fill with a lighter pellet, put the transfer port setting on its highest setting and then begin adjusting the regulator and hammer spring down until you get the desired velocity and accuracy with your chosen pellet. You can experiment a bit with turning the TP adjuster up or down to test efficiency and velocity because if you have the gun tuned down quite a bit a wide-open transfer port may not give you the highest velocity and accuracy. At this point, it is set for optimum performance with that particular pellet and shouldn't be wasting air, and with a quick turn of the power wheel, it can be easily turned down for even lower power if needed. Remember, if you turn the regulator down (clockwise) you need to remove the air from the gun, otherwise, you will ruin the regulator!!!
 This deforms the pellet much less, which in turn increases the ballistic coefficient and makes the pellet less susceptible to wind. It also allows the pellet to be shot at higher velocities without destabilizing, and, in fact, poly barrels tend to like shooting very hot. LW poly barrels have an almost mythical reputation for accuracy and that was borne out in our testing. So let's look at that now. 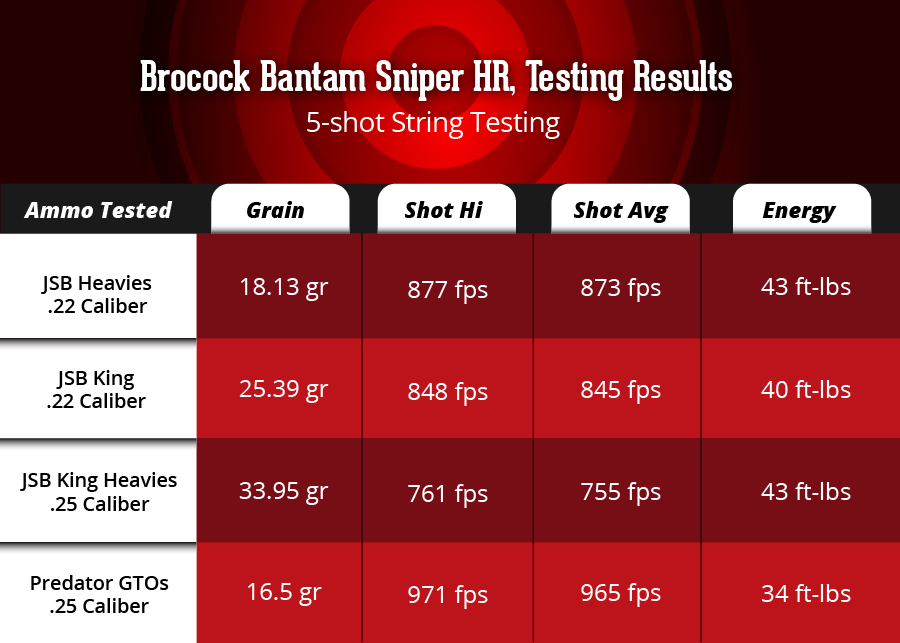
 An observation: the Sniper HR really shines in .177 and .22, but, in our opinion, it is perhaps a touch underpowered in .25, so if that is the caliber that you want, then you might want to step up to the Sniper Magnum with its longer barrel and higher power. However, the .25 Sniper HR shoots the Predator GTOs at about 930fps, so if you want to go lead-free then it would still be a great choice.
 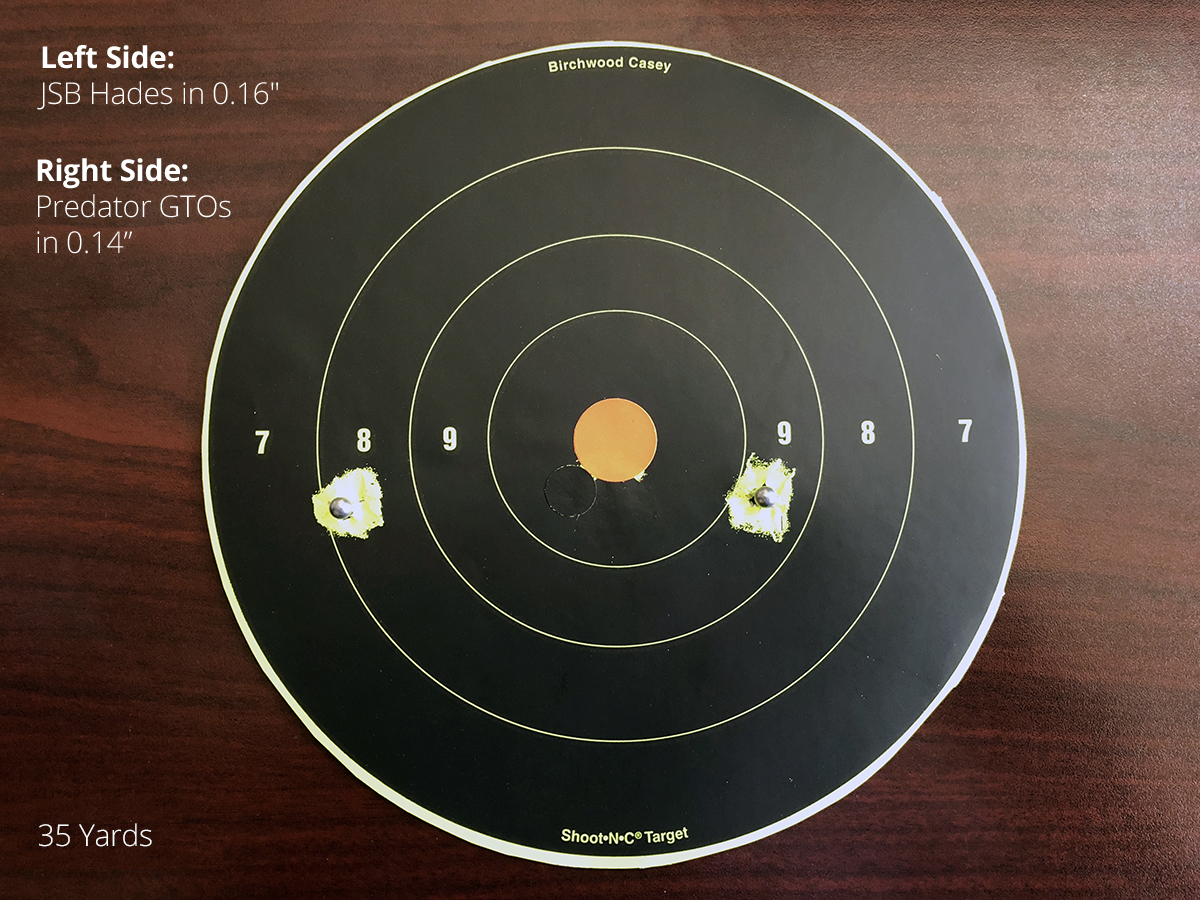 At 100 yards we just shot one group because the first group we shot was so good we just left it at that! One of the shots was a called flier, but 9 of them went into a group that measured 0.92 inches by 0.85 inches. And this was with a very poor scope that we struggled with. Had we put on a scope that it deserved, the group would surely have been even smaller. This gun is a shooter!
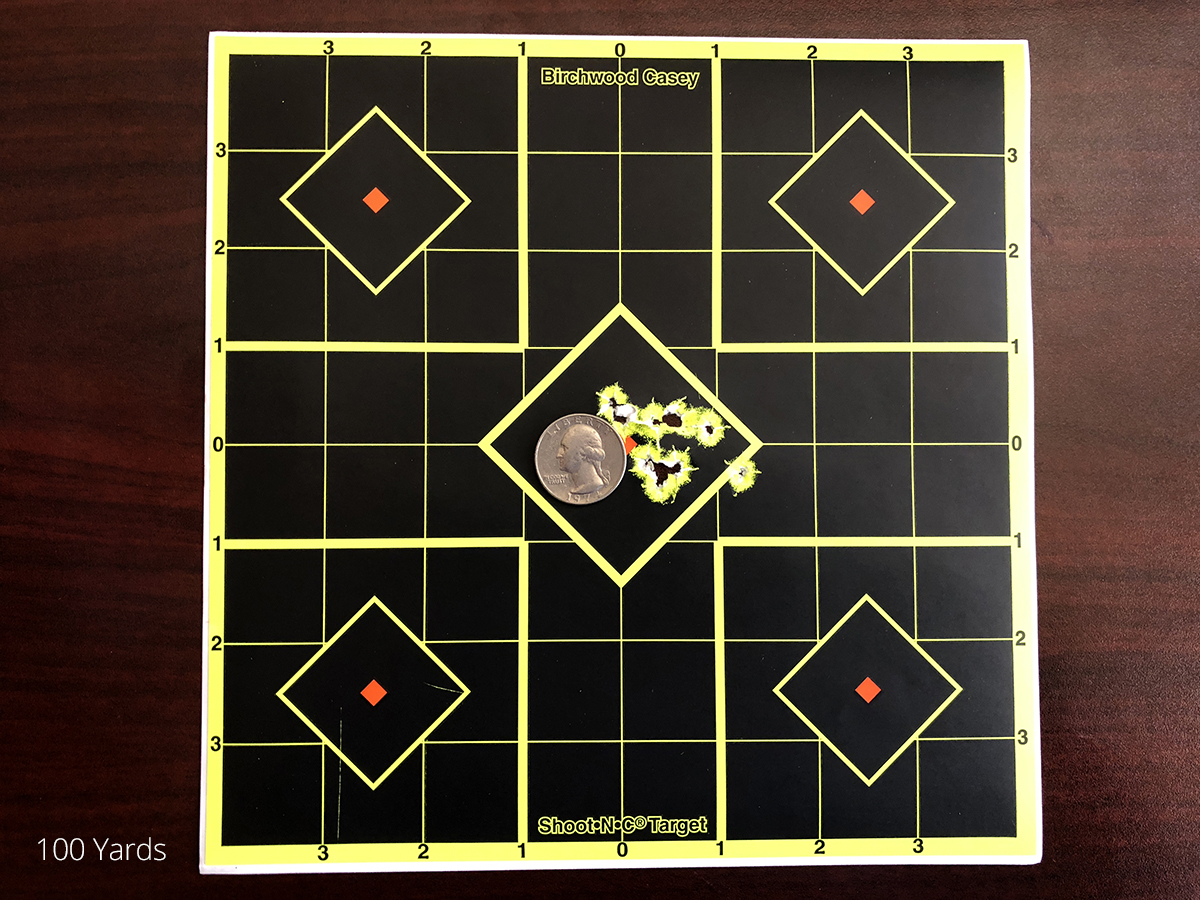
Part 1 - Bantam Sniper HR
The Bantam Sniper HR weighs about 7.5 lbs and measures 35" long. One of the things you'll notice first is how compact it is thanks to its semi-bullpup configuration. Brocock pioneered the semi-bullpup by bringing the barrel of the gun about 4-5 inches behind the action in order to give you most of the advantage of a bullpup but without the disadvantages. It cuts down on the length and brings the weight backward so it is easier to shoulder, but it isn't as far back as a standard bullpup so the muzzle doesn't wobble all over the place. The semi-bullpup design also allows you to get a proper cheek weld and have the scope closer to the bore axis than on a typical bullpup. The Sniper comes with a ten-shot magazine whether your gun is in .177, .22, or .25, and it is one of the best magazines on the market. It is solidly built, but the reason we really like it is that it puts no lateral pressure on the pellet as it is being loaded into the chamber. This is because it has an internal mechanism that retains the follower carriage instead of relying on the pellet itself to do so. Another advantage of the design is that the magazine can also be easily topped up and also stored on the gun. It does allow you to fire on empty, but you can't have everything! The Sniper also ships with a single-shot tray, and again, a nice little feature is that you can insert it from either side so you can load the pellets with either hand. Adjustability
We have gotten accustomed to a high level of adjustability on top of the line PCPs and the Bantam Sniper HR did not disappoint us. We have already mentioned the trigger and the stock but there is plenty more. The transfer-port power wheel, hammer spring adjustment, and externally adjustable HUMA regulator give it all of the adjustability of any luxury PCP on the market, and more than most. The transfer port adjustment is the quickest and easiest way of adjusting the Sniper, and it controls the power by constricting the airflow to the barrel through one of five different settings (six settings on the Magnum version) with crisp detents for repeatable consistency. Part 2 - Bantam Sniper Magnum
Now that we have covered the Bantam Sniper HR from top to bottom, let's look at its bigger brother, the Sniper Magnum, and see how it differs. The stock and receiver of the two guns are pretty much the same, apart from the transfer port adjustment which has five settings in the HR version and six in the Magnum. The real difference between the two guns is the barrel. Instead of a traditionally-rifled 17" Lothar Walther barrel, the Magnum sports a 24" LW polygonal barrel, the same barrel that is found on just a select few of the very highest-end rifles, including the Daystate Red Wolf. In fact, as far as we know, this is the most affordable rifle this barrel has ever been featured on. In spite of being quite a long barrel, the gun overall is still pretty compact, measuring just 40" from stem to stern. For comparison's sake, the .22 Crown is just about the same length, but it has a 20" barrel, which shows the benefits of the semi-bullpup design. The extra length accounts for the increased power in the Magnum over the HR version, but the really interesting aspect of the barrel is the rifling. Instead of typical rifling that cuts grooves into the pellet in order to impart spin, the cross section of a poly barrel is polygonal, or stop sign shaped. Power and Performance
We did chronograph testing with four guns, but we only did a full shot string with the Sniper Magnum in .22 caliber. With the transfer port on setting 4, we got 62 shots. When we turned it down to setting three, the shot count jumped up to 86 shots per fill. It is advertised as being a 45 fpe gun in .22 and with the JSB Redesigned we got about 43 fpe. That's pretty close, and with a bit of adjustment could probably get there. Accuracy
When it came to accuracy, the Sniper Magnum blew us away. At thirty-five yards we were getting very small groups with a variety of ammo, almost all of them being under 0.20" for ten shots. But the best groups were shot with Air Arms 16gr, Predator GTOs, JSB Hades, and JSB 18.13 Heavies. It put 5 Air Arms 16s in 0.11 inches, 5 Hades pellets in 0.16 inches and ten GTOs in 0.14 inches. This is phenomenal accuracy! Accessories
Since this gun is regulated you could use a hand pump to fill it up because you could fill it up part way and still get plenty of shots on the reg, however, we recommend you pick up either a compressor such as this Air Venturi, or this Daystate, or a large carbon fiber tank. A gun like this deserves a top quality scope that will really let you get all of the accuracy out of the gun that it is capable of. We recommend the Athlon Midas Tac or the Hawke Sidewinder. Summing Up
The Bantam Sniper HR and Sniper Magnum are two of the best values on the market. They are rugged and dependable and will provide you with a lifetime of incredibly accurate and enjoyable shooting. They have tons of adjustability, the HUMA reg provides you with unmatched consistency, the Lothar Walther barrels are the cream of the cream and crazy accurate, and the semi-bullpup configuration brings you the best of both bullpup and long gun configurations. In addition, each Brocock has a three-year factory warranty. If you want a high-end gun you can depend on, check out the Brocock Bantam Sniper.Detailed Review
brocock-bantam-sniper-4.gif
Please Note: You must be 18 years of age or older to order and conform to all laws governing the use and ownership of airguns in your local area. More Info
2025 Airgun Depot, 12453 S 265 W Suite F, Draper, UT 84020. All rights reserved. Terms of Use