Basic Anatomy
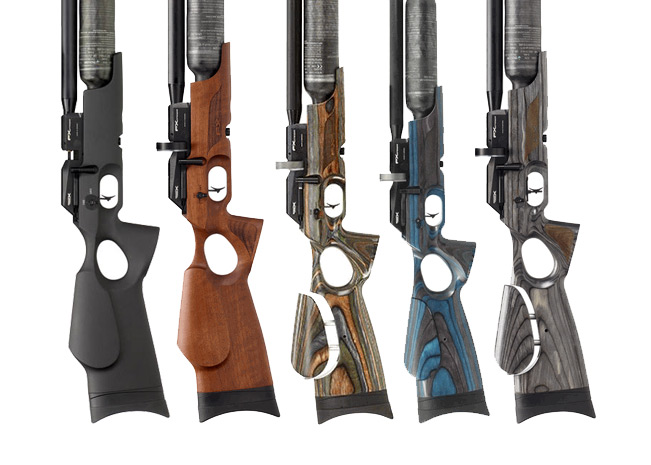
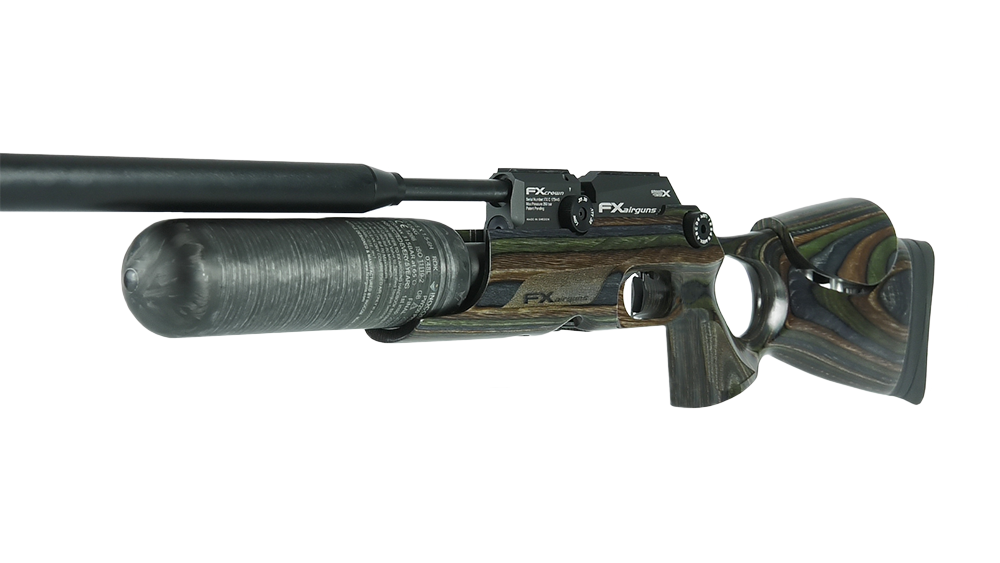
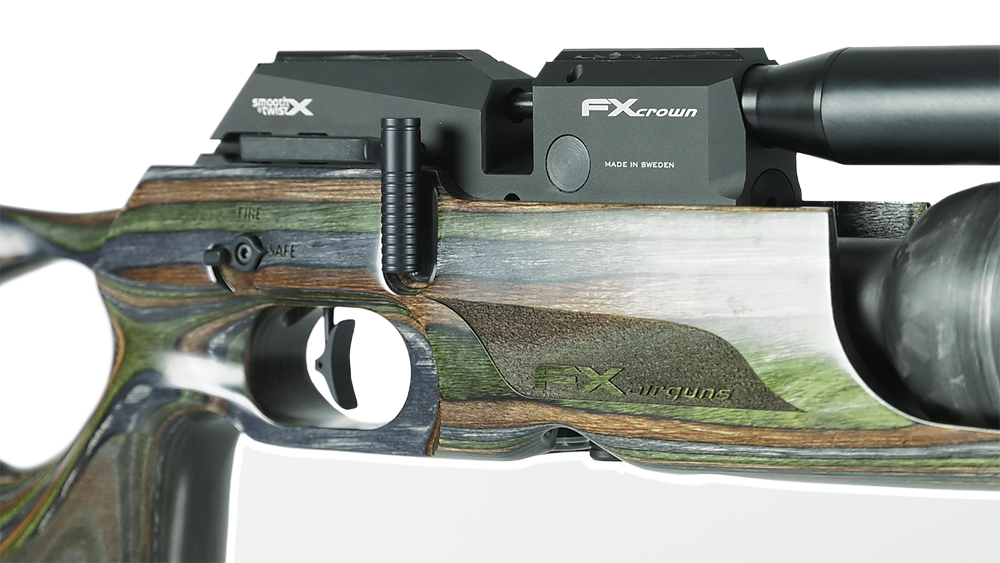
You can choose between a walnut, synthetic, or laminate stock. In laminate you have three options as well; available in Black Pepper, Sapphire Blue, or Forest Green. No matter which option you choose, you will be struck by the Crown's slim lines, perfect balance, and an indescribable sense of elegance. The Crown exudes quality.
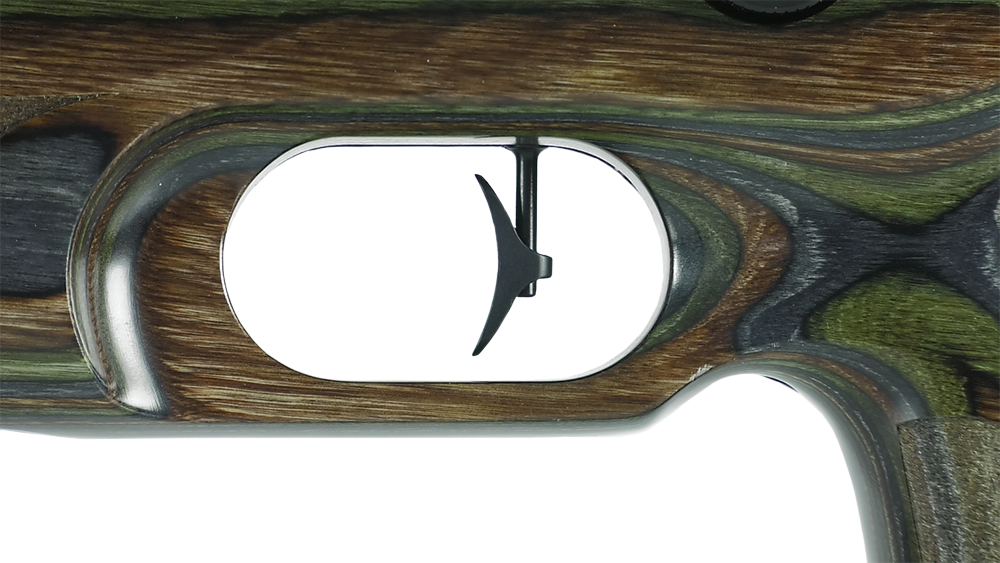
The gorgeous stocks are made in Italy by the famed craftsmen at Minelli, and the full range of their talent is on display here. The pistol grip is comfortable and the delicate in letting above the grip lets you rest your thumb either above or around the grip. Stippling on the forestock and grip add comfort and security to your hold.
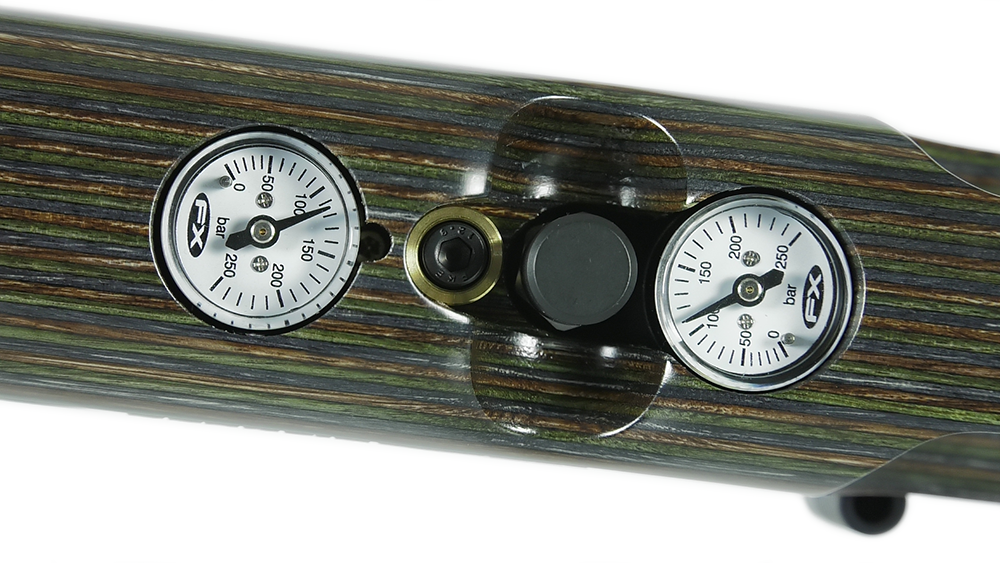
As your eyes go over the gun you will notice
two manometers on the bottom of the stock that show the pressure of both the air cylinder and the regulator. They are separated by a Foster Quick Disconnect fill port covered by a Delrin dust cap.
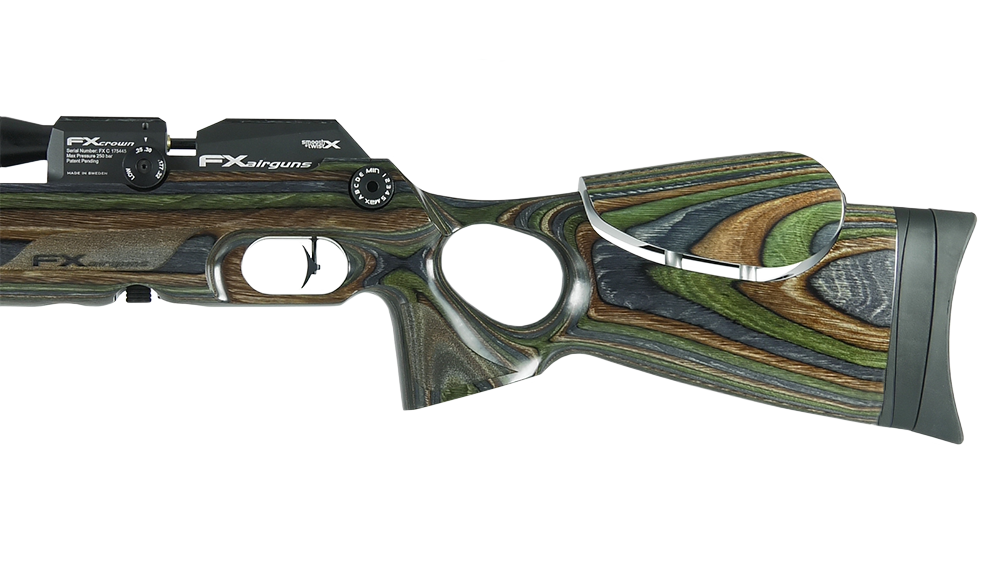
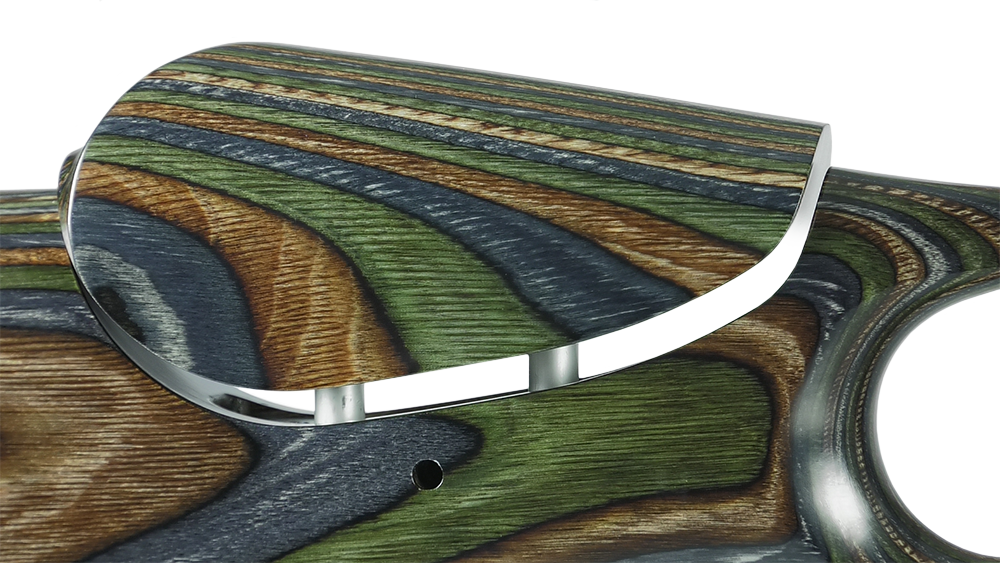
A proper cheek weld is necessary to keep your eye lined up consistently with the scope for repeatable accuracy and
the Crown's comb has a wide range of adjustment to fit any cheek. Loosen one screw with a 4mm Allen wrench and set the comb so that your eye is lined up perfectly for each shot. Note that the synthetic stock does not have an adjustable comb.
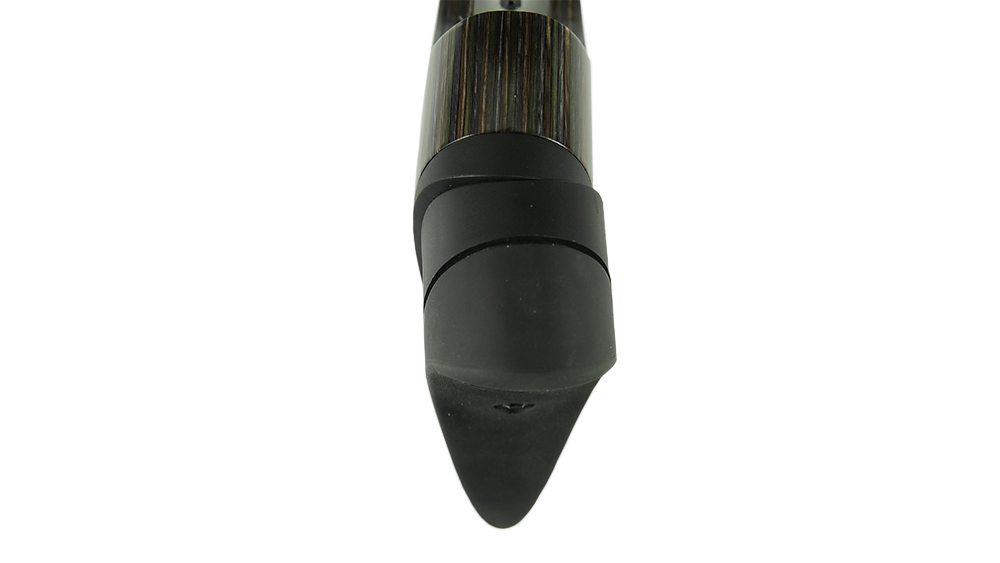
The
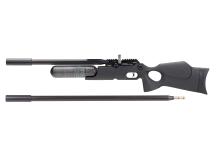
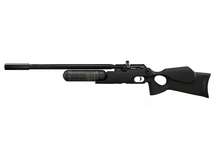
telescoping shroud is one of Fredrik Axelsson's strokes of genius. In a second or less you can take your Crown from quiet to whisper quiet. The pellet hitting the target will be louder than the gun itself! The extent to which the shroud telescopes is technically adjustable, but you won't see any real improvements over the factory setting. For best accuracy, shoot with the shroud either fully retracted or fully extended.
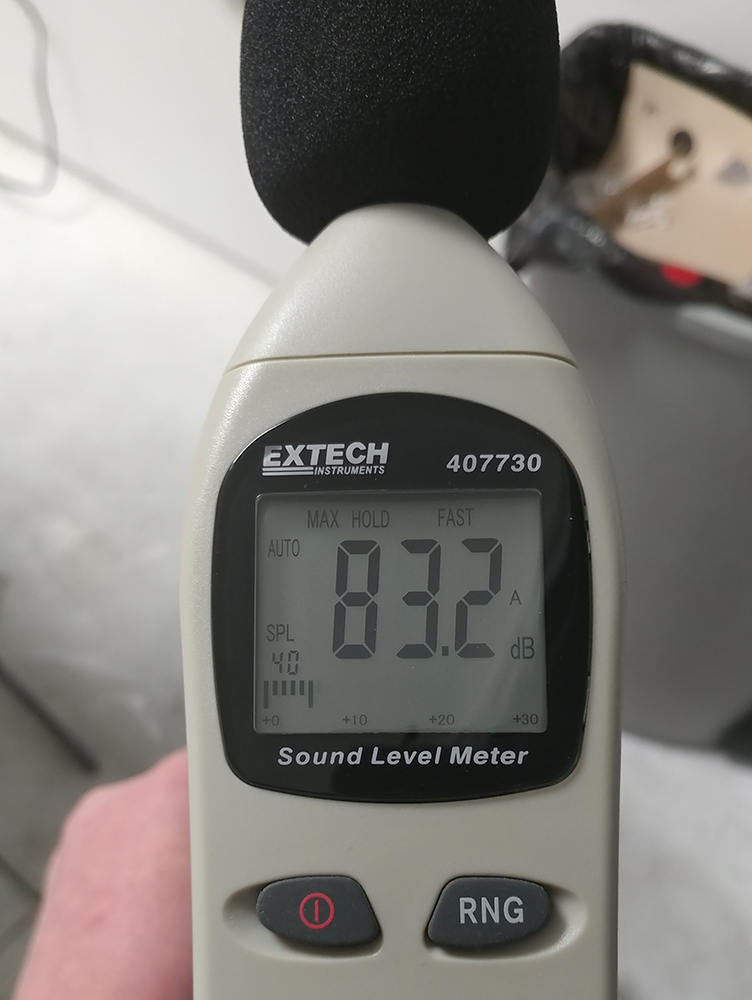
We took these readings in our enclosed shooting range with the shroud extended, and with the Crown on max power the highest reading was 83.2db. With the hammer spring adjuster on min power and with the transfer port still on .25/.30, the highest reading was 67.5db, or about the level of a normal conversation.
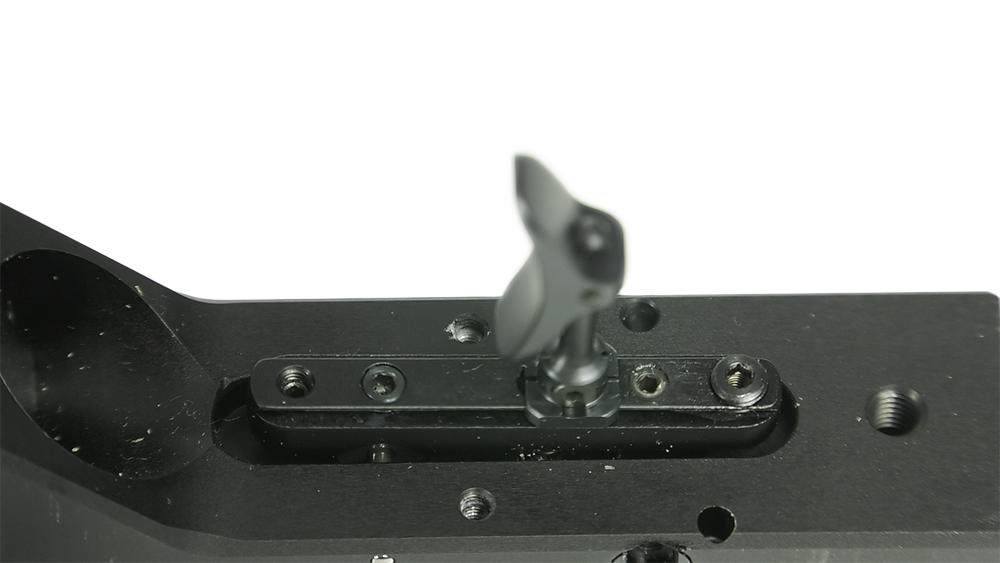
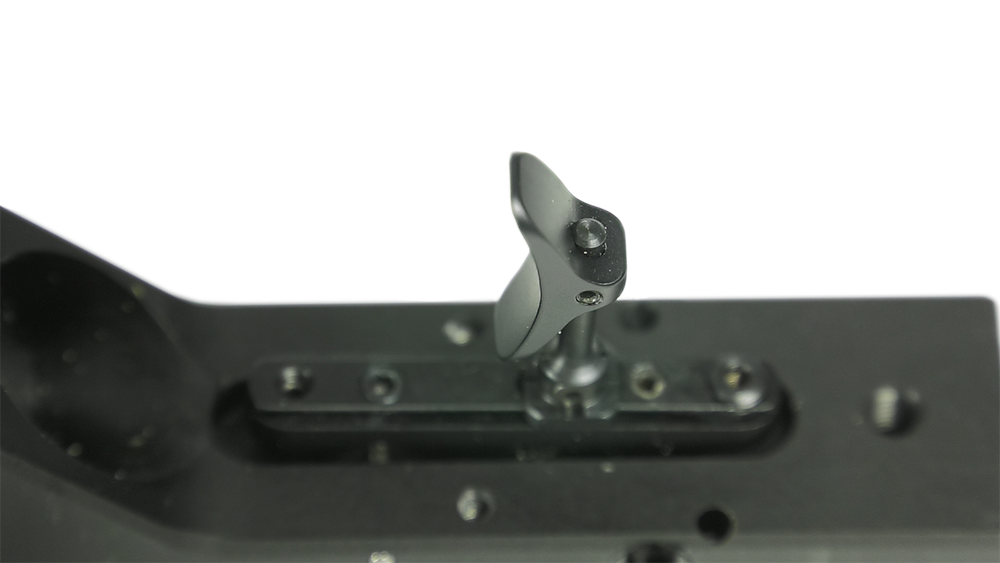
The elegant European side-lever action of the Crown is silky smooth and functions flawlessly. It has been modified from previous designs (as found on the FX Royale) and its relatively short length lets you chamber another pellet for a quick follow-up shot without removing your hand from the grip. The cocking lever makes the Crown extremely fast to cycle and fire and because there is no perceivable recoil, follow up shots are very quick. The design of the gun is so ergonomic there is almost no learning curve to firing fast and accurate shots every time. Line up a few cans or bottles and you'll be able to blast them pretty much as fast as you can pull the trigger. For a non-semi-auto gun, the Crown is about as fast as they come. And it can easily be uncocked--just hold the cocking lever back, pull the trigger, and push the lever forward.
The 480cc carbon fiber bottle on the Crown gives you loads of shots while keeping the weight down. It fills to 250 Bar or 3600 psi and with the Foster Quick Disconnect fill port you won't have to keep track of probes anymore. One of the features we like most about the bottle is an internal valve that allows you to remove it from the gun while it is still filled with air, as long as it is filled to at least 100 BAR. We have spare cylinders available and they can easily be switched out in the field. The
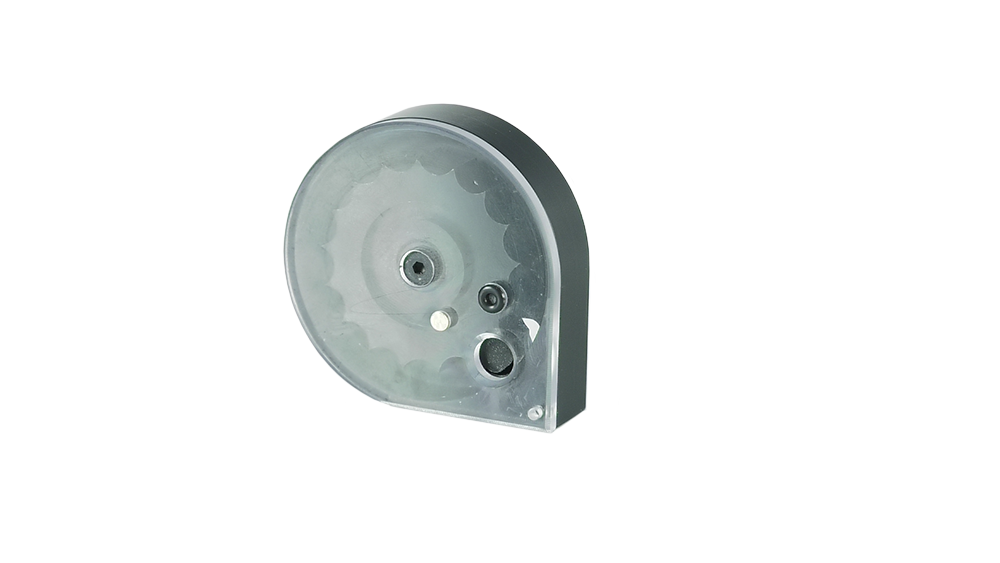
high capacity magazine of the Crown lets you shoot more and reload less. It is one of the largest of any airgun magazines on the market and it feeds and indexes flawlessly. The breech slot is cut at an angle so you can mount most scopes with medium or high rings and the large magazine will still fit. To load the magazine, rotate the clear plastic cover to the left (counterclockwise) until it stops. This loads the spring tension on the magazine and enables it to self index. Turn the magazine over and insert a pellet in skirt first. This will keep the magazine in place. Now turn magazine cover clockwise, placing a pellet nose first in each space. Then finish rotating magazine cover to the right until it clicks back into its original position. You'll get accustomed to it soon enough, but if at the beginning you can't remember which way to turn it, it may be helpful to remember that to begin with, you have to move that inner circle around, and turning it to the right won't do it.
Here are the capacities of the various magazines:
- 21 shot (.177)
- 18 shot (.22)
- 16 shot (.25)
- 14 shot (.30)
You'll notice that the Crown magazines from the front look identical to the Impact magazines, but they are inserted differently and aren't interchangeable.
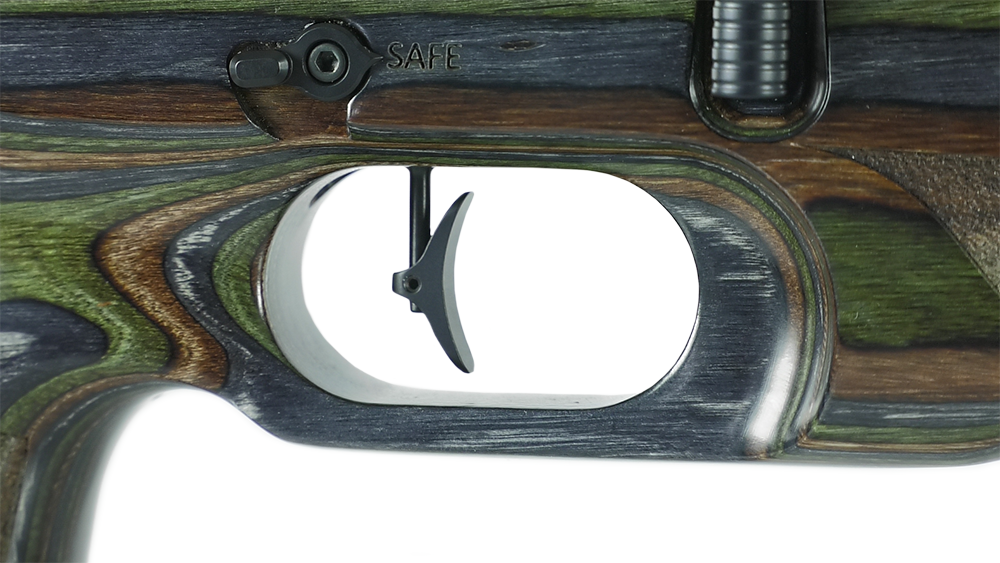
The Crown's match trigger enables you to achieve the ultimate in precision shooting. It is light, consistent, and has an extremely crisp and predictable let off. It comes
from the factory breaking at about 15 oz. The first stage is short with around 8 oz of pull weight, then it comes against a clear second stage. A little bit more pressure and it breaks like glass with virtually no over-travel. Once you try it you'll agree that this trigger is the standard against which all other triggers must be measured.
The trigger is fully adjustable, but it is so light and crisp that you will probably leave it just the way it is. But if you are experienced and want to adjust it, then the front two screws are the ones to begin with. The first screw adjusts the first stage travel and the second screw adjusts both second stage travel and weight. Adjustments to one screw will generally require adjustments to the other. The rearmost screw adjusts overtravel and can be adjusted at the end of the process. Leave the screw just behind the trigger alone. Make very small adjustments, and you may find it helpful to keep a record so you can return it to factory settings if you wish.
You may need to remove the action from the stock to be able to adjust the trigger screws. First, put a towel on your workbench so no little parts get away from you. Use a 2.5mm Allen wrench to remove the safety switch. Then, making sure the gun is not cocked, use a 2mm Allen wrench to remove the rear power adjuster and carefully because it contains two small ball bearings that are easy to lose. Remove them and remove the two very small springs that support the ball bearings. Now, use a 4mm Allen wrench to remove the screw in front of the fill port and then the screw behind the trigger. You can now remove the action and adjust the trigger. When you reassemble the gun, be careful to not over-tighten the front stock screw because it only goes through a very thin section of wood and can easily be pulled through it. The manual safety is conveniently placed and can be switched on or off without removing your hand from the grip. This safety is the same you find on modern AR rifles and is easy to use.
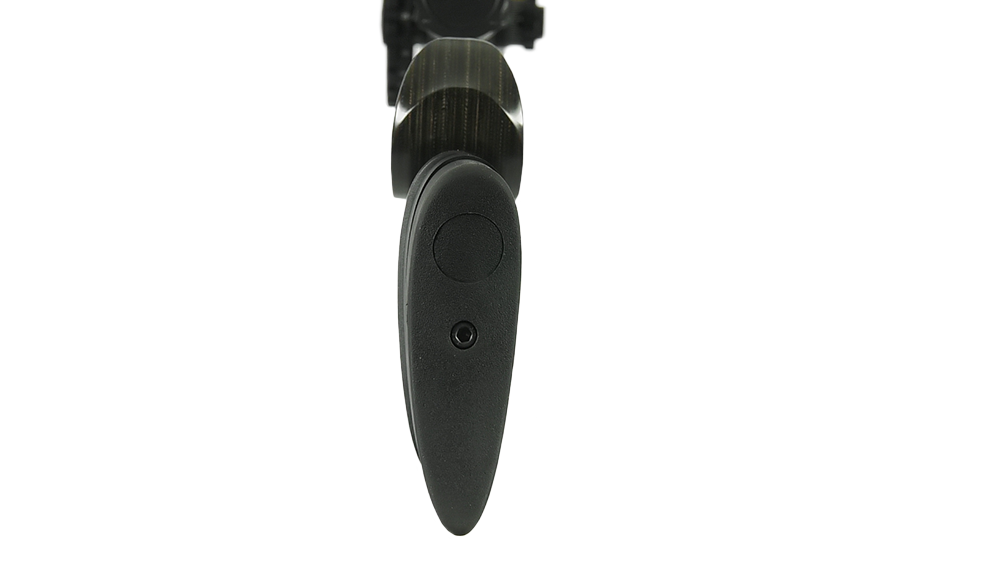
The Crown's fully adjustable buttplate ensures that the gun fits you perfectly and shoulders smoothly every time. It can be adjusted both for height and cast on / cast off. To adjust the height of the buttplate, loosen the single screw at the back with a 5mm Allen wrench. Lower the buttplate then tighten the screw. To adjust for cast on or cast off, remove buttplate and loosen, but don't remove, the two screws underneath with a 2.5mm Allen wrench. Adjust buttplate to your liking. (Many shooters will prefer a slight bit of cast off, that is, with the buttplate turned into the shoulder and away from the cheek.) Tighten back up and replace buttplate.
The Crown is the most adjustable airgun in the world and the adjustments are all very easy to make.
The power adjustments of the Crown help you in three ways. First, you can turn the power down when you want either a lot of shots or don't want the pellet to go through the game or pest and damage whatever is behind it. Second, it allows you to change calibers and still have optimum speed and power levels. Third, it enables you to tune your gun for the greatest accuracy with the pellet you are shooting. In general, you want to find the velocity that your pellet is the most accurate at and gives you the power you need, and you want it to achieve this velocity without a lot of extra air creating turbulence behind the pellet as it leaves the muzzle. The Crown's extreme adjustability gives you three ways of achieving this.
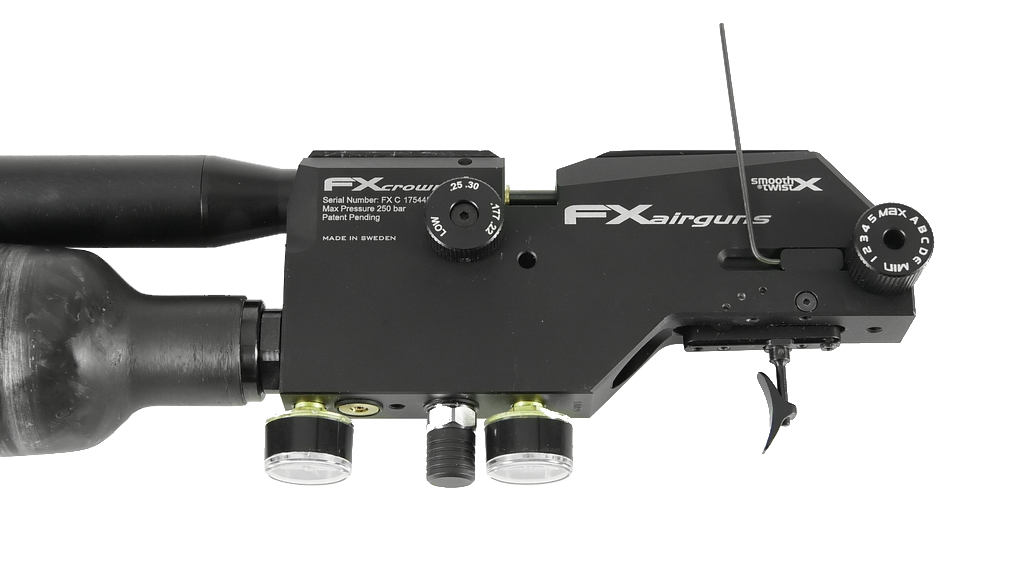
1- The Front Power Adjuster or Transfer Port Adjuster restricts the flow of air going into the breech. You can dramatically change the power with three different settings. It doesn't affect air consumption as much as the rear adjuster does because the air has already left the valve before it gets here. While earlier versions showed a 1,2,3, the wheel is now clearer with its recommendations for .25/.30, .177/.22, and Low. The adjuster wheel can be turned left or right or all the way around, it doesn't matter. Crisp detents ensure that your adjustments are exact each and every time.
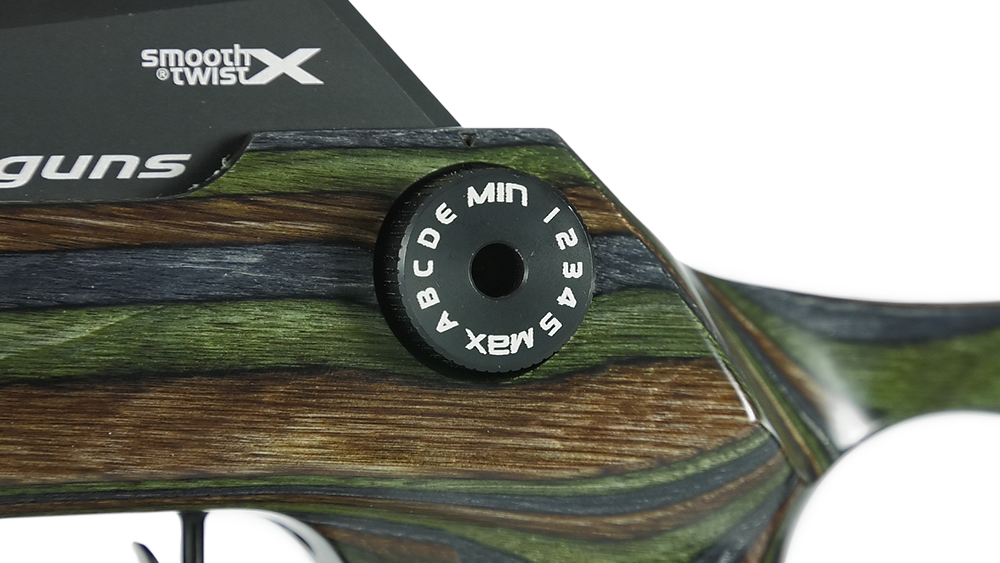
The transfer port setting on .25/.30 The transfer port on setting .177/.22 The transfer port on low setting 2- The Rear Power Adjuster or Hammer Spring Adjuster adjusts the tension of the hammer spring. Because it determines how hard the hammer hits the valve, this adjustment affects both power and air consumption. 7 levels give you small adjustments with some variation between the letter and number sides. Crisp detents mark each level. It's best to only adjust the hammer spring when the gun is not cocked. This wheel can also be turned either way or all the way around.
3- The Externally Adjustable Regulator adjusts regulator output pressure. The regulator adjustment screw is set just behind the cylinder manometer. We recommend that this be the last thing that you fiddle with. FX does an immense amount of research to develop the perfect factory settings, so see if you can get the Crown to do what you want with the other adjustments and then adjust this one if needed. But if you change calibers you will need to adjust the regulator. Turning the screw clockwise lowers the reg pressure and turning it counterclockwise raises the reg pressure. Make small adjustmentsone or two full turns can drastically change the reg pressure.
Please NoteNever turn the regulator adjuster CLOCKWISE under pressure! It will damage the regulator. The best practice is to remove the bottle, empty any remaining air by turning the rear power adjuster to MIN so you don't damage the regulator, and dry fire once or twice to empty it completely. Then using a 2mm Allen wrench you can turn it a clockwise until it gently stops. Put the bottle back on and start to raise the regulator pressure by turning the screw counter-clockwise until the pressure is where you want it. Keep it between 55 BAR and 160 BAR.
The level and convenience of the Crown's power adjustments are unmatched, and ensure that no matter what situation you are in, you will have the power and accuracy you need.
The most innovative aspect of the FX Crown is the Interchangeable Barrel System, also called the X Barrel. It is not an overstatement to say that it is perhaps the greatest advance in rifling in centuries! The true barrel of the gun is actually a Smooth Twist X barrel liner that has rifling impressed on it from the outside. The manufacturing process results in a bore that is incredibly smooth and polished and this eliminates fliers resulting from lead build up and other irregularities. This barrel liner is inserted into the outer barrel housing. Both components make up what is called the X Barrel commonly.
The most exciting aspect of this system, though, is the
ability to switch out liners to obtain different twist rates. The standard liner in .25 with a twist rate of 1:30 is optimized for JSB 25.39 grain pellets, but if you want to shoot slugs at ranges unthinkable with pellets then you can insert a barrel liner with a twist rate better suited for its ballistic coefficient. And at a very affordable price, barrel liners won't hurt your wallet. Note that at the time of writing the slug liners are still being developed, but should be available mid-year of 2018. An added benefit of the full-length rifling is the barrels are less pellet fussy than the previous Smooth Twist barrels, although JSB pellets are the ones the barrels are designed around and still tend to be among the most accurate.
The Interchangeable Barrel System in the Crown opens up infinite possibilities for you and is revolutionizing the airgun world. Exchanging barrel liners is very easy. First, extend shroud fully, and while still pushing forward, twist it until it locks in place. Then turn counterclockwise to unscrew. This will expose the air stripper/shroud support. Insert a pencil or screwdriver, etc., to loosen it and remove it to expose a threaded insert. Loosen this with a 10mm wrench and remove to expose the end of the Smooth Twist X barrel liner. Using a piece of rubber, cloth, leather, cardboard, etc., to protect it, use pliers to gently twist the liner far enough out that you can grab it with your fingers and remove fully. Removing the liner may leave at least one of the two to three o-rings inside. If you can't shake them out, don't dry fire the gun. Simply remove the barrel and use a cleaning rod with a mop to push it out. (See the section below on changing calibers for instructions on removing the barrel.) We also find that twisting the liner as you remove the liner from the outer barrel housing will often retain the O rings outside of the barrel. Now, take your barrel liner of choice and space two or three o-rings along its length. (The liner locks in place both at the back and front of the barrel so the o-rings are there only to dampen the vibrations of the liner and not to center it. Don't stress about getting each one perfectly spaced. In fact, just one o-ring in the middle will do a pretty good job. If you are struggling to get the o-rings to go all the way in, wrapping tape on either side of them to keep them in place will save you some hassle. Push the liner in until it stops. About half an inch will remain protruding. Insert the threaded sleeve section, tightening it gently so that it doesn't bow the liner, and replace the air stripper, tightening it firmly without overdoing it. Replace the shroud and you are done! The whole process should take you about five or ten minutes. Note that you cannot change calibers by exchanging liners--you will need a full barrel kit for that.

The barrel kit for the Crown comes with the barrel housing, barrel liner, shroud, and pellet probe, but not the
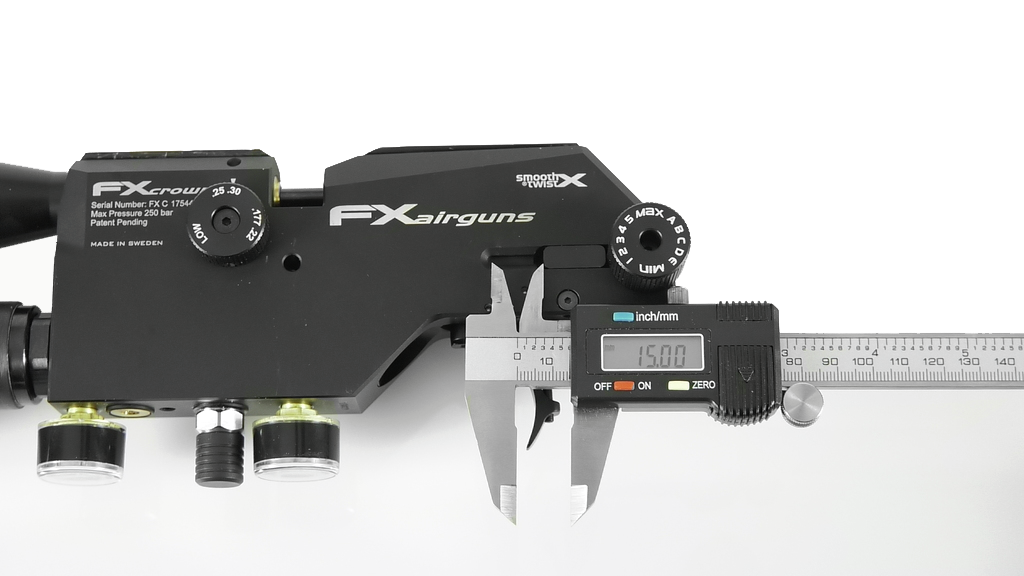
magazine. Removing the barrel is very simple. First, use a 3mm Allen wrench to remove the front two set screws in the breech block and a 4mm Allen wrench to remove the rear one. Gently pull the barrel straight out. Put a very thin coat of pure silicone grease on the o-rings of the new barrel and gently slide it in, being careful to keep it lined up so it doesn't bind. A notch on the bottom of the barrel will fit over a small bead in the breech ensuring that everything settles in correctly. You shouldn't be able to rotate the barrel at this point. Replace set screws and tighten firmly, but, again, without overdoing it. To replace the probe, pull the cocking lever back to expose the screw that attaches the probe to the bolt and use a 2.5mm Allen wrench to remove it. Insert the new probe and replace the screw. It is very small, so be careful not to over-tighten and strip it. When changing calibers the hammer spring tension may also need to be adjusted. Adjusting the hammer spring tension allows the shooter to control how hard or soft the trigger strikes the valve. This, in turn, determines how much air is released when the gun is fired, which in turn determines how fast the pellet travels down the barrel. This is where a good set of calipers comes in. The hammer spring adjuster is located on the left side of the rifle next to the power adjuster wheel. Note this adjustment is really only needed if changing calibers drastically, changing calibers only one size larger or smaller can be adjusted by using the power wheel (if set to the higher caliber factory settings). You will need to remove the gun from the stock (see directions above) and replace the hammer spring adjustment wheel.
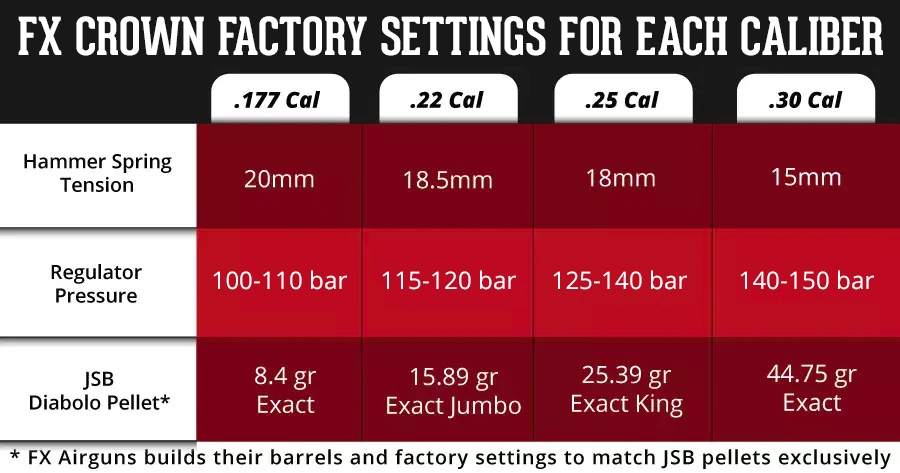
Before adjusting your hammer spring you will want to set the power wheel to the Max setting, you will also notice that the adjuster is loose in its housing when the rifle is not cocked. This is because there is no tension on the hammer spring. To adjust the hammer spring you will turn the adjuster screw with an Allen wrench. Turning the screw clockwise increases the hammer spring tension which in turn will increase velocities that the pellets exit the barrel. As you adjust the hammer spring tension in or out you will notice that the gap between the slot in the guns frame and where the tensioner housing rests will get smaller as you increase tension and larger as you decrease tension. Measuring this gap with your calipers will allow you to properly match the FX factory settings for each caliber as shown in the factory settings chart. Note that the measurements are taken from the edge of the black, sliding hammer spring housing to the edge of the beveled portion of the housing slot.
Accuracy, Power, and Shot Count
An immense amount of innovation and cutting-edge technology has gone into the Crown, and it may be one of the most beautiful airguns around, but none of that means a thing if it can't shoot. But don't worry, this gun is a shooter! We have come to expect accuracy from FX airguns but the Crown surpassed all of our expectations.
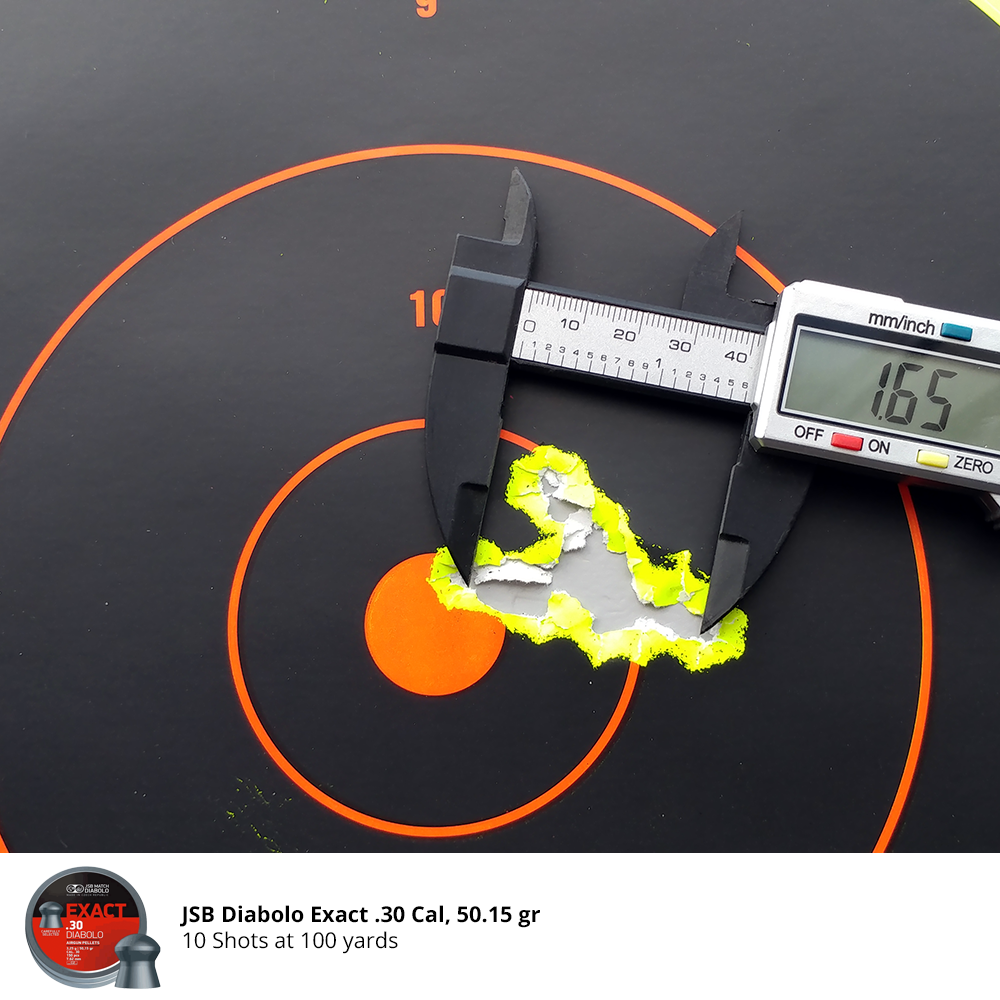
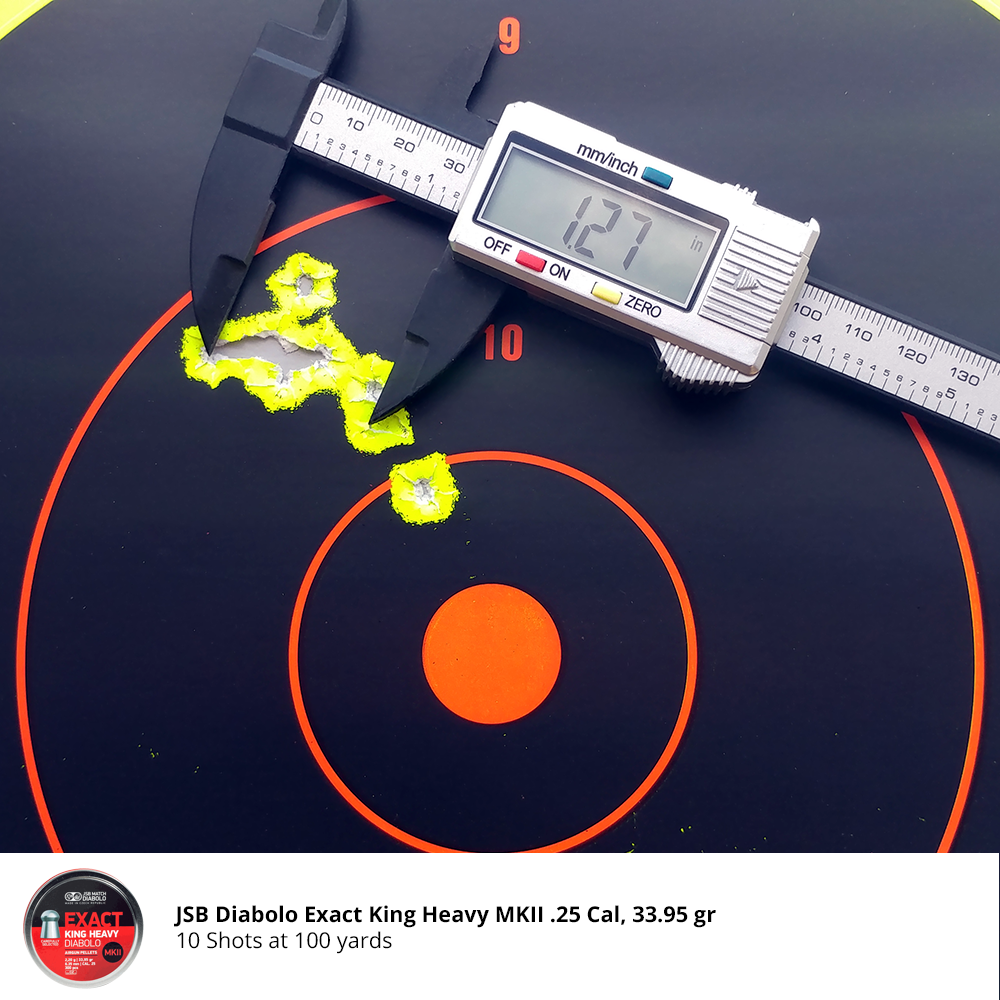
At 35 yards, using the JSB King 25.39 grain pellets 16-shot groups of 0.15" center-to-center were repeatedly achievable. To get an idea of the size, lay a nickel on top of another and the combined thickness is about 0.15". That means that the point of impact varied only by a little over half the width of the pellet. There is something indescribably satisfying about shooting group after group and having each pellet go where you expect it to without any fliers. This gun's reputation as perhaps the most accurate sporting air rifle in the world is very well-deserved indeed!
Note that when you first get your Crown you will want to pull a few patches through the barrel to remove the coating that the liners ship with, otherwise your accuracy out of the box won't be what you expect. Don't use a brush and rod, just run some patches on a string sucked through the barrel with a vacuum.
With the hammer spring adjuster set to max, you will get about 70 shots on the regulator in .25 caliber. At this level, JSB 25.39 Kings average 916fps and generate 47.3 foot-pounds of energy. The JSB King 33.95s averaged 806fps and generated 49fpe. You will most likely shoot the 25.4s on setting 5 or 4 and you can plan on about 90 shots on setting 5 and even more on 4.
With the hammer spring adjustment set to the minimum you will get well over 200 shots in .25 caliber! The JSB King 25.39s will only be doing about 630 fps but Predator GTO 16.54gr lead-free pellets will be sailing out at about 745fps and at that velocity they are quite accurate. This means that on one fill you can shoot an entire tin of GTOs and then some! At that velocity, you will be getting just over 20 fpe, which in our opinion is perfect if you need to do some pesting in a barn, around feedlots, or just want to plink in your backyard. And the Crown is nearly silent at this setting.
To sum up: With simple adjustments, you can take the Crown in .25 cal from nearly 50 foot-pounds of energy down to 20 foot-pounds and still have great accuracy. At its highest power setting you get a lot of shots, and at its lowest setting the shot count is astonishing. The Crown gives you so many shots you can say goodbye to air anxiety. Here are some numbers for the various adjustments. For these tests, we left the regulator as is and only adjusted the hammer spring (rear adjuster) and transfer port (front adjuster). You, of course, can modify these results with regulator adjustments.
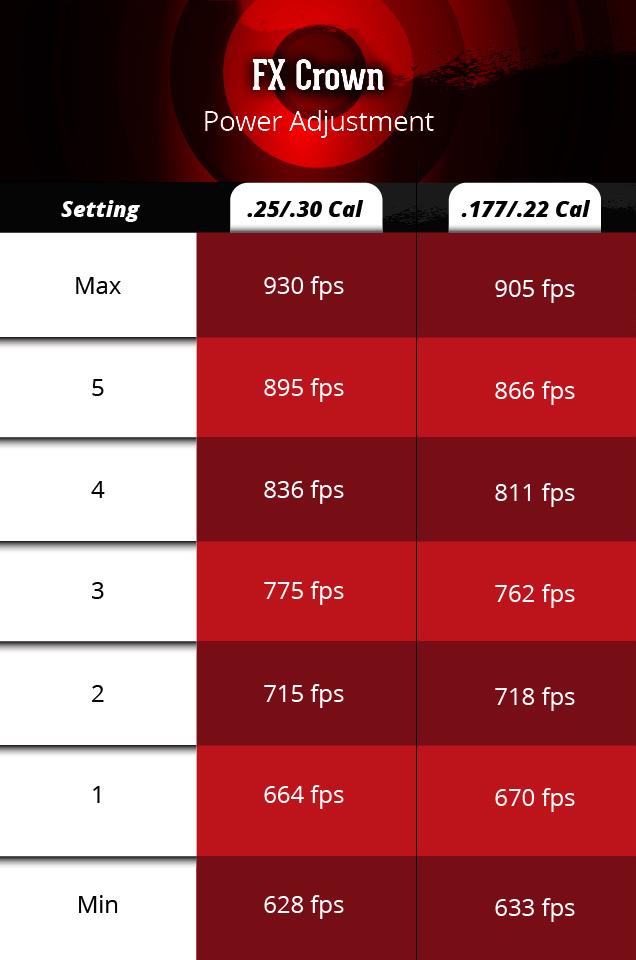
A few things are apparent from this chart. First, toggling between high and medium on the transfer port adjuster and only using the number side on the hammer spring wheel gives you 14 power adjustments spanning 311 fps. At the lower hammer spring adjustments the air transfer seems to be slightly more effective with the transfer port set on medium instead of high, but it doesn't really make much difference either way. Now, the letters on the hammer spring will give you slightly different results than the numbers, so really there are 28 adjustments possible! And then, of course, you can adjust the regulator.
With these small adjustments, you can fine-tune the accuracy of your Crown for results you could never imagine before. Accessories
There is no need to buy a separate case because your Crown comes with a hard plastic case and in it will be one magazine, an FX quick disconnect fitting (it is a standard QD but made to be easier to remove from the port) and a manual. The first accessory you will need for your Crown is a scope, and with an airgun, with the capability of the Crown you don't want to skimp on the optic. For hunting we recommend the
Hawke Frontier 30 SF IR 2.5-15x50 AO. The glass is crystal clear, the magnification is in the range we prefer for hunting and the reticle gives you plenty of points for holdover and windage. The large objective and 30mm tube gather a lot of light and the illuminated reticle will give you an edge in low-light shots at dawn and dusk.
For target shooting we recommend both the
Hawke Airmax 30 SF IR 8-32x50 AO and the
Hawke Sidewinder 30 SF IR 8.5-25x42 AO. The Sidewinder has a slightly lower magnification range and also a lower overall profile compared to the Airmax and both are excellent scopes with great glass and useful reticles.
If you're planning on long range airgun shooting, don't just pick up standard picatinny rings for your Crown. You'll want to pick up the
FX No Limit 30mm Rings These are incredible rings that allow you to actually vertically adjust and angle your mounts so you can take some extremely long shots without the need for a riser!
If the Crown is your first PCP you will need a way to fill it. Hand pumps are a possibility but filling a 480 cc bottle with a max fill pressure of 250 bar will definitely give you some exercise. A more attractive option is a
carbon fiber tank that will give you quite a few fills before you need to have it topped off. And for an endless supply of air, the
Air Venturi Air Compressor is a reliable and affordable option that will last a lifetime.
FX is working on exciting new accessories for the Crown (like different twist rate barrel liners), so get on our mailing list to stay up to date!
Summing Up
The FX Crown air rifle combines cutting edge innovation with a dedication to accuracy and quality that is unsurpassed in the industry. The interchangeable barrel liners and interchangeable calibers combined with the incredible adjustability of the Crown means that you will have a gun that will do whatever you ask of it. The Crown will soon become the most personalized gun that you own and will provide you with a lifetime of shooting enjoyment. Once you've sent some lead down range with your Crown tell us about it in the comments section below, and leave a review of it to help other airgunners.
Extreme Adjustability With the Crown you can adjust the transfer port, the hammer spring, and the regulator, all without taking the airgun out of the stock. This gives you the option to adjust the Crown to your heart's content most PCP air rifles. That's what we call extreme adjustability.
Interchangeable Barrel System The most innovative aspect of the FX Crown is the Interchangeable Barrel System, also called the X Barrel. It is not an overstatement to say that it is perhaps the greatest advance in rifling in centuries! The barrels are available in varying twist rates optimized for either pellets or different weights of slugs.
Quick Caliber Change Barrel Kits The Crown's Barrel Kits let you change the caliber of your Crown in minutes. The adjustability of the Crown means that you can take your gun from a .177 to a .30 and it will shoot each caliber perfectly. No other company gives you this range of possibilities as affordably or conveniently!
Telescoping Shroud for Ultimate Silence The telescoping shroud is one of Fredrik Axelssons strokes of genius. In a second or less you can take your Crown from quiet to whisper quiet. The pellet hitting the target will be louder than the gun itself!